
Home Blog Page 23

Health Advisory – Mountain Sickness

Welcome to another article on my Ladakh tour guide. In this article, I would explain from travellers perspective about mountain sickness. What is AMS? How to deal with it. Do’s and don’ts and common myth about mountain sickness. Leh district is situated at an altitude that ranges between 3000 to 5486 meters. On the contrary to popular belief that everyone suffers AMS, actually there are very few. Often people with active lifestyle won’t have this issue.

However, let’s talk about the tourist who actually suffers from AMS. There are different altitude-related disorders like Acute mountain sickness, High Altitude Cerebral Edema (HACE), High Altitude Pulmonary Edema (HAPE), and conditions of Hyper-coagulation. High altitude sickness can happen to anybody. Most noteworthy to people traveling above 8000 ft (2440 meters). Proper medical precautions should be taken to counteract these. If you follow simple rules, this will not happen to you.

Hey, check out my YouTube channel with all my Ladakh videos.

Why does Mountain Sickness happen?

Low pressure & rarefied air in Leh results in low barometric pressure of the ambient air. As a result of this lungs are able to pump less oxygen in the body. Tourists encountering sudden altitude bump is more susceptible to mountain sickness. This is the reason I do not prefer taking a flight to Leh. I prefer road trips to mountain places.

This way your body has plenty of time to adapt to altitude change and combat mountain sickness. Going to the mountain is not a race so give your body time to acclimatize. If somehow to get mountain sickness then get yourself treated and take precautions. Furthermore, if precautions are not taken then acute mountain sickness can further escalate to HAPE and HACE and can lead to possible fatality.

Symptoms of High Altitude Sickness

  • Headache which I encountered at Khadungla Pass
  • Nausea and Vomiting
  • Fever and weakness with loss of sleep and appetite
  • Disorientation, dizziness and loss of co-ordination
  • Memory loss and features related to the psychotic imbalance
  • Coughing and spitting blood with sputum and with lips, nails and tongue turning blue.

Do’s & Don’ts in High Altitude Mountain Sickness

First, let’s take a look at the “Do’s”

1. Follow this procedure to Acclimatize
  • Always remember the rate of acclimatization is different for different people. It depends on the lifestyle they have.
  • Once you arrive at high altitude, take rest for a day. If you are going to sumits then It is advisable to take a complete 24 hours rest before climbs.
  • Do not smoke or consume alcohol. This is a big NO!
  • Carry Diamox with you, this is a common drug for speeding up acclimatization. However, before taking this consult your doctor. Even if you take Diamox, do not take it more than 250 mg. On the contrary, there is no substitute for natural acclimatization.
  • I would also recommend exercising a little every day.
2. Plan Your Trip – This way there is less chance of getting acute mountain sickness
  • I always prefer to reach Leh from Srinagar and not from Manali. In other words, the altitude increase is gradual from Srinagar and not from Manali.
  • When you reach Leh try to be in the city for a day and then make plans for Khardungla, Nubra Valley and Pangong TSO or Moriri TSO.
  • Older folks are advised to consult their doctors before going to the places above.
3. Take Proper Diet
  • Drink lots of warm water. If you were to ask me to quantify it, at least 5 litres a day. Take more oral fluids like juices to avoid dehydration.
  • I also recommend taking a diet which is rich in carbohydrates.
4. Proper Clothing
  • Clothing should be comfortable. In addition to being comfortable clothes should be windproof, well insulated and waterproof. Bikers are advised to wear biker jacket with all three layers inside.
  • Carry spare socks, gloves and a pair of shoes with you. I did this mistake and did not carry an extra pair of shoes. Had to ride in wet shoes.
  • Use dark snow goggles when in snow areas. If you do not wear dark glasses your eyes are going to hurt looking at the ice around. This can also cause partial blindness.
  • Change clothes periodically, especially if they are wet. Gloves, socks and shoes are to be immediately changed if they get wet.

Now let’s take a look at the “Don’ts”

  • Avoid any kind of stressful exercise in the first 24 hours of reaching high altitude places. Basically just avoid exertion.
  • Do not skip meals
  • Try not to bunk at places above 13000 ft during the night. Rules of the mountain say that you climb high and rest low.
  • Do not stay at high altitude passes for a long time. Like I spent 15 minutes at Khardungla and 15 minutes around in Changla.
  • Weat protective clothes do not get exposed to high wind velocity for long. This is the reason why I like biker jackets.
  • Do not take sleeping pills or any drug prescribed. If it is mandatory please consult your doctor.
  • Please do not disregard any signs of mountain sickness. It can Acute mountain sickness, High Altitude Cerebral Edema or High Altitude Pulmonary Edema. You never know!

What to do in case of Mountain Sickness?

  • Consult a doctor immediately.
  • In case if the doctor is not available, there are plenty of oxygen points at every tourist spot. Administer oxygen from cylinders.
  • Immediately descend to a lower altitude, this will help you a lot.
  • Follow the army rule. Never leave anyone behind. In no condition do not leave the affected person behind. Help each other in the mountains. Good deed comes back.

Mentioning Emergency Contact Numbers for Leh below.

  • Sonam Norbu Memorial Hospital: 01982-252014/253629 (They help with the emergency cases)
  • Office of chief medical officer Leh: 01982-252012
  • 24 hours emergency number: 102, 01982-253629

Summing Up

Mountain sickness like Acute mountain sickness, High Altitude Pulmonary Edema (HAPE) & High Altitude Cerebral Edema (HACE) can happen to anyone. This sickness can happen at any time. The idea is to be safe, do not panic, follow proper procedures and take precautions as suggested above.
Planning Ladakh Itinerary By Flight

Ladakh itinerary by flight is the easiest option. Planning an itinerary for Ladakh when you are taking a flight can be tricky. Furthermore, if you have less time to take this trip, like 7 to 8 days, it requires proper planning. Leh by air is tough as your body had to cope up with the pressure of a sudden altitude jump.

This is my third article on the Ladakh guide. Check out my earlier articles about how to reach Leh & about days needed for Ladakh travel. Let me shed more light on Leh by flight and its Pros & cons.

While I was on my trip to Ladakh, one of my close friends called me up. He wanted to visit Leh but he had no time. I advised him to take a flight from Delhi to Leh. Since he had limited time, coming to Ladakh by air was the only option. However, he was skeptical about timing, AMS, and the places he can cover in 7 to 8 days. So decided to put together this custom itinerary for travelers coming to Leh by flight.

Hey did you check out my YouTube channel? My Ladakh videos are there!

Ladakh Itinerary by flight – Day wise

Before I share the itinerary, let me stress the fact that Delhi is a mere 227 meters above sea level. On the other hand, Leh is at 3524 meters above sea level. You need to take proper rest, keep yourself warm and drink warm fluids to combat mountain sickness. I would also advise carrying Diamox. This medicine helps combat mountain sickness. Let start….!

Day – 1 Rest and arrange permits.

There are several Delhi to Leh flights. You can find cheap deals on booking.com below.

Booking.com

Ok, so in one hour and 30 minutes, you will climb to an altitude of 3524 from Delhi. An altitude bump of 3297 meters. On the first day relaxing. Take a rest, stay in your hotel for a day, drink plenty of warm water.

I would recommend not to sleep in the daytime. If you want you can go for a stroll at the local market. Check out Tibetian Kitchen which is in the main market. They serve some pretty good sizzlers.

Avoid smoking and alcohol at every cost, especially if you are going there for the first time. Now since you are taking rest for half of the day, I would advise getting the inner line permits. This permit allows you to get to Khardungla, Nubra Valley, and Pangong TSO. This is easy and can be done online. I gave my hotel guy the money and he got it for me. Eat light in the night and go to sleep as you need to wake up early.

Day – 2 Shanti Stupa, Hall of fame & Tsemo Gompa

Spend the second day around Leh. Go visit Shanti Stupa which is one of the magnificent Tibetan structures that has ever been built. The architecture and the beauty of this place are unexplainable. Shanti Stupa is a white-dome structure dedicated to Buddhism. The second place that you should visit is the hall of fame.

Hall of Fame is a museum constructed by the Indian Army in memory of the brave Indian soldiers who laid down their lives defending the motherland in the Indo-Pak wars. The third and final place for today is Tsemo castle or Tsemo Gompa. This gompa was founded by King Tashi Namgyal in 1430 AD who was a big follower of Buddhism. As a mark of his respect for Buddhism, the king built the monastery above his palace. Situated at the cliff of Namgyal hill, its architecture is impressive.

All the above places are in the 45 km range. So a day is enough to visit all these tourist attractions.

Day – 3 Khardungla Pass, Diskit Gompa & tea at Khalsar

Now on the third day when you have your inner line permit, you can explore more beyond Leh’s boundary. I would advise you to wake up early in the month and head to Khadungla pass. The road is good to Khardungla so it should not take you more than 1 hour and 45 minutes.

There are a few bad patches in the middle where BRO is constructing roads. But they are few and small patches. You need to have breakfast at Khungla, there is an amazing cafe up top.

After breakfast head to Diskit Gompa which is around 75 KM from Khadungla pass. The main and unique attraction of Diskit monastery is a gigantic statue of Lord Buddha on the top of it. This popular monastery is located in the Nubra valley of Ladakh. While coming back to Leh, you can stop at Khalsar village for a cup of tea. This is the least populated village in Nubra valley.

Day – 4 Pangong lake & Hemis Monastery

Pangong lake is beautiful and so is the Hemis monastery. If you like extreme off-roading you can take a road to Pangong lake via Nubra Valley. However, if you want no bumpy roads then take the road from Karu to Pangong. Enjoy tea and lunch at Chang La pass, an amazing cafe over there. Pangong lake is around 170 km from Leh. Take a night stop there. There are many camps around the lake.

Day – 5 Adios Pangong lake welcome Thiksey & Shey

Spend the morning at the lake. Have your breakfast in the camps and then start heading towards Leh. On your way back I would recommend stopping and visit Thiksey Monastery and Shey Palace. Thiksay Gompa, Thiksey Monastery or Thiksay Monastery is a gompa of Tibetan Buddhism religion. It is located at the top of the hill. Shey Palace Leh is a royal residence of the Ladakh monarchs and it is the main attraction of Shey. Reach Leh by evening, have your dinner, and relive all the memories. I am sure by this time you will have enough pictures and videos. Take a night’s rest in Leh.

Day – 6 Sham Valley Tour

Reserve this day for the Sham Valley tour. Also known as the “Apricot valley”, this valley has beautiful villages. The sham valley is a little ahead of the village of Likir, towards Khaltse. If you had ample time it would take around 3 days just to cover Sham valley. However, since we are short on time I would advise visiting major attractions of Sham valley.

This includes Magnetic hill which is 26 km from Leh. Likir Gompa is around 50 km from Leh. Now it depends on how much time you are spending at each place. You should have enough time to cover Indus and Zanskar Rivers Confluence. Further ahead from Magnetic hill and a little before Nimmu village is the confluence of Indus and Zanskar rivers.

Indus river flows in from Tibet, originating in the vicinity of Mount Kailash and Lake Mansarovar, while Zanskar river originates in Zanskar valley before both of them merge here.

Day – 7 Hot water springs

The tour is incomplete if you do not visit Chhumathang. Chhumathang hot spring located about 40 km north of Puga, Ladakh. to provide heat directly. This is called the direct use of geothermal energy.  From Leh, it is 138 km approx. You can experience the hot water bath for a nominal price of 50 INR. They have separate rooms for women and men folks.

This is one of those places where you would not have too much of a crowd. You will reach Leh by late evening. Now you have two options: take a flight in the night or take a night rest at Leh. Party a little hard, but make sure not too much intoxication else you will miss your morning flight to Delhi.

Videos from my Ladakh road trip.

Summing Up

Few tips before I sign off and write another article for you.

  • Consumption of alcohol is not advised, try to avoid it.
  • Stay warm and hydrated at all times.
  • Be very cautious while driving, stay away from Indian Oil Tankers, please.
  • Start early morning and sleep latest by 9 PM, unless you want to party
  • I could find fuel pumps from Manali to Leh only at Tandi, Leh, Karu, Diskit and Nubra Valley
  • BRO warning signboards are funny yet packed with important messages. Obey them!
  • Keep mountains clean for god sake. No Littering!!
  • Do not buy water bottles, instead keep refilling the same bottle which you have.
  • Carry a trash bag and try to bring your trash back with you.

Leh by flight

If you have any questions please leave in the comments below. I would love to answer them.

Mountains are calling!

Ladakh Tour Guide – How many days do I need?

This is my second article on Ladakh tour guide. Read the first article here in which I covered how you can get to Leh. Let’s consider the ideal scenario for the above question. If you want to visit Leh from Srinagar Leh Highway, it will take around 4 days. If you take the route from Manali it takes 2 days to reach Leh.

I covered 495 Km to Leh in two days with a stop at Sarchu. The duration of your tour depends on what route you want to take and what places do you want to cover around Leh. However, it comes to approx 12 to 14 days. Let us dig down more deeper and see how much time is required when we take different routes and cover places around Leh.

There are two road routes by which you can reach Leh. First one and the most preferred by bikers is the Srinagar Leh highway and the second one is Manali Leh Route. We will talk about the trip duration when taking a flight to Leh separately in this Ladakh tour guide article.

Dear Readers,

I would be adding one extra day for acclimatization on all the routes. The idea is to travel safe and healthy.

Please carry acclimatization drugs in case of emergency like Dimox.

Srinagar Leh Highway

Now if you want to enjoy the breathtaking view of Srinagar Leh Highway, I would recommend making stops at Jammu, Srinagar, Kargil. These places are beautiful and worth spending a night. So on the fourth day, you will reach Leh. Furthermore, this means that it takes 3 days to reach Leh from Srinagar.

Now you would need a day to roam around Leh city. You can visit the Khardungla top on the same day. The second day can be kept for Nubra valley and then finally Pyongyang TSO. So it would take around 11 days for Ladakh when you go and come via Srinagar Leh Highway. Acclimatization should not necessary as from Srinagar its a gradual climb. However, I recommend to stay in Leh for a day and relax. Go to the Tibetian Kitchen and have amazing sizzlers.

Srinagar Leh Manali Circuit

Most of the bikers prefer to do this. When you do this circuit you cover almost all major attractions right from Srinagar to Leh and then Manali. The route will be like Jammu, Srinagar, Kargil, Leh, Nubra Valley, Pyongyang TSO, Sarchu, Jispa, Keylong & finally Manali.

This is a long-stop itinerary. So this would again take 11 days approx in total. However, when I did Manali to Leh and then back to Manali, I did not stop on my way back at Jispa or Keylong. I just stopped at Sarchu for a night and the next evening I was in Manali.

Manali to Leh & back to Manali

Do this route if you are short on time, but you want to cover Leh by road. A most noteworthy thing to remember is that when you start the climb from Manali towards Leh, it will be a steep incline. If you are not acclimatized, you might encounter breathing issues and dizziness. So make sure that you do some simple treks around Manali and stay in Manali for a day.

I love Vashisht, so every time when I go to Manali, first place I head to is Jugni waterfalls. So 2 days to reach Leh, one day in Leh, One day for Nubra Valley, one day for Pyongyang TSO and 2 days back to Manali. So in total this way you can do the trip in a total of 8 days. (One day for acclimatization in Manali)

Watch this playlist on my YouTube Channel for all my videos of my Ladakh trip.

Reaching Leh by Flight

Now if you have a scarcity of time and if you want to do this trip in a week, take a flight. I won’t recommend this though. If you are heading towards mountains make sure you have ample time.

It’s a vacay for christ’s sake, not a marathon. But if you are hell bound to do this, then one day of acclimatization at Leh and 2 days to cover Nubra valley and Pyongyang TSO. So from Delhi and back covering all the major tourist spots in Leh can be done in 7 days, a week.

Why I wrote this article in my Ladakh tour guide series?

I started “Ladakh Tour Guide” section in my blog because I have always felt a strong connection towards mountains. However, when I was thinking of taking a Royal Enfield trip to Leh, I was not sure of the route, stops and the time needed. I consulted a lot of my friends and everyone had a different tailored tour plan for Leh.

Even though I have covered all major possibilities for a custom tour plan, an actual tour plan depends on a lot of factors. Controlled factors like where and for how much time you want to stop at a particular place. Un-controlled factors like unpredictable weather, body acclimatization speed, and landslides, etc. Take the recent case of 370 in J&K. I so wanted to return back from Srinagar but couldn’t. let’s leave this for next year, shall we?

So I hope you liked this article, if you have any questions please drop in the comments below. I would try to answer them ASAP.

“Somewhere between the bottom of the climb and the summit is the answer to the mystery why we climb.”

Greg Child

How to reach Leh Ladakh? By Air, By Bus, By Bike or By Train!!

The first question which comes to a traveler’s mind is how to reach Leh Ladakh? There are various means by which you can reach this beautiful paradise. First, let me tell you why is this place is so famous among travelers. I call this place as the adventure capital of India. Ladakh is one of the very few destinations in the world where the entertainment starts the moment you begin your travel towards it.

This place somehow pumps the adrenaline in your body once you start thinking about it. The place is equipped with scenic routes. Furthermore, the place is bestowed with valleys, snowfalls, frozen lakes, trekking routes, and much more. Let me tell you the ways by which you can reach Leh Ladakh. Let us start with the most preferred way. Reaching Leh Ladakh by Air. The second would be my favorite which is a bike ride to Leh.

Taking a flight to Leh

Taking a flight to Leh is preferred by travelers who are short on time. It’s true, taking a flight is the easiest way to travel. Leh is connected with Delhi, Jammu and Srinagar airports by direct flights. Delhi to Leh there is a daily direct flight service offered by many airlines.

The nearest airport is Kushok Bakula Rimpochee Airport which is located in Leh. The airport is basically a military terminal and thus, the security is a bit strangling. It is advisable to have all your documents ready when you enter Ladakh via the airport. It is better to have a hard copy of your e-ticket. So if you are short on time reaching Leh Ladakh by air is most favorable.

Taking a bus to Leh

There are private buses and government buses from Manali and Srinagar. These two being the nearest and important towns you will get plenty of buses. Most of these buses are early in the morning. If you catch a bus from Manali you will have to go via Rohtang Pass. On the other hand, if you take a bus from Srinagar to Leh, you will go via Zoji La pass. The routes from Manali are open from early June to September.

Furthermore, from Srinagar, the routes are open from June to October. Personally, I would advise taking the Srinagar route. Reason: It helps you to acclimatize slowly to rising altitude and secondly the route is more scenic from Srinagar.

Bike ride to Leh

If you are an adventure lover and love to ride your bike, this is the best way for you to reach Leh. I have seen in my visit to Leh, that most of the travelers prefer this mode of commute. I went for a solo ride to Khardungla from Jaipur. Luckily I met a few friends at a hostel in Manali. A guy from Holland and a Turkish couple.

They were going to Leh by bus, but after looking at my Royal Enfield, they decided to do a bike ride to Leh. This place has the world’s top three highest mountain passes. Biking along with the mountain passes and stopping for a steaming cup of coffee, tea & maggie is something I did every few hours on my ride.

Now, as mentioned in the above paragraph about the routes you can do any of them. However, I would like to be on a record of saying that Srinagar to Leh route is much better and scenic then Manali to Leh.

Train to Leh? Is it possible?

First of all, good news for all the train lovers. Indian railways are laying down train tracks from Bilaspur to Manali to Leh. Imagine being able to travel to the scenic Leh by train, that too on the world’s highest railway line! The proposed Indian Railways line is scheduled to become operational by the year 2022.  However, as if now the nearest train station is Tawi which is 700+ km from Leh. Above all, even if you take a train to Tawi, you will have to catch a bus or take a bike ride to Leh. So till the time the train track from Bilaspur to Leh is open, this will be the most NOT preferred way of reaching Leh.

Hire a Taxi for Leh

This is by far the most expensive way of getting to Leh. More expensive than reaching Leh Ladakh by air. Unless of course you are in a sharing Taxi. Price ranges from as low as 12,000 INR to 45,000 INR depending on which month you go. I find taxi drivers in Manali not too friendly. Unless you have a local friend, which thankfully I have. A couple of years back I went on a solo backpacking trip and inquired the price to till JUST Rohtang. To my amazement, the driver told me it was 30,000 for an SUV from Manali and return. Imagine paying 30 grand for 100 km. However, if money is not a constraint, then you can keep this option open.

Note: Please keep in mind that an HP number plate vehicle is not allowed past Leh. Like if you want to go to Khardungla, Pyongyang or Nubra Valley, you cannot take your Manali rental bikes. All personal registered bikes are allowed through. There is some issue between the two tour unions of J&K and HP. Either you take your personal bike or you rent a bike from Leh again with a JK number plate. This sucks though!

CHECK OUT MY YOUTUBE CHANNEL

Checkout my Leh & Ladakh Video Logs.

Back to Leh Ladakh travel guide.

“The mountains are calling and I must go.”

Feel like going for this adventure. Check the availability, do a search below.

Booking.com

PHP Update Required – How to fix this?

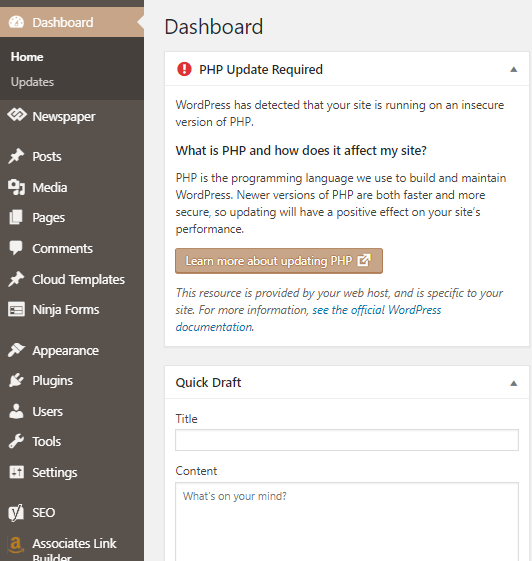
Blogging does make you learn a lot of things. For e.g. I had no knowledge about making a website. Now, I feel that I am too familiar with WordPress and have created a lot of websites for my friends and known. Today, I woke up and checked my dashboard. I got an unusual warning saying that “PHP update required”. I saw this warning in the Dashboard once I upgraded to WordPress 5.1 “PHP Update Required, WordPress has detected that your site is running on an insecure version of PHP“.

php update required in wordpress

Let us understand, what is PHP & why PHP update required?

PHP is the coding language of WordPress and they always recommend us to update it to the newest version to ensure the speed and security of our websites. I almost forgot about it until seeing that reminder. In case you are using shared hosting services, you can go to PHP Selector in cPanel to set up your PHP environment.

Hey, I am there on YouTube as well, check out my channel.

Varun, A blogger out in the world to make his mark.

Important things to take care of before updating PHP in WP

  • Back up your Websites: Make a backup of your websites or server before updating PHP version. Although there is a little risk during the process, making a backup is still recommended.
  • Login to your Cpanel of your hosting company.
  • Check the current version of your PHP
  • Disable PHP5 (Or whatever is your current PHP version) and enable PHP 7.3

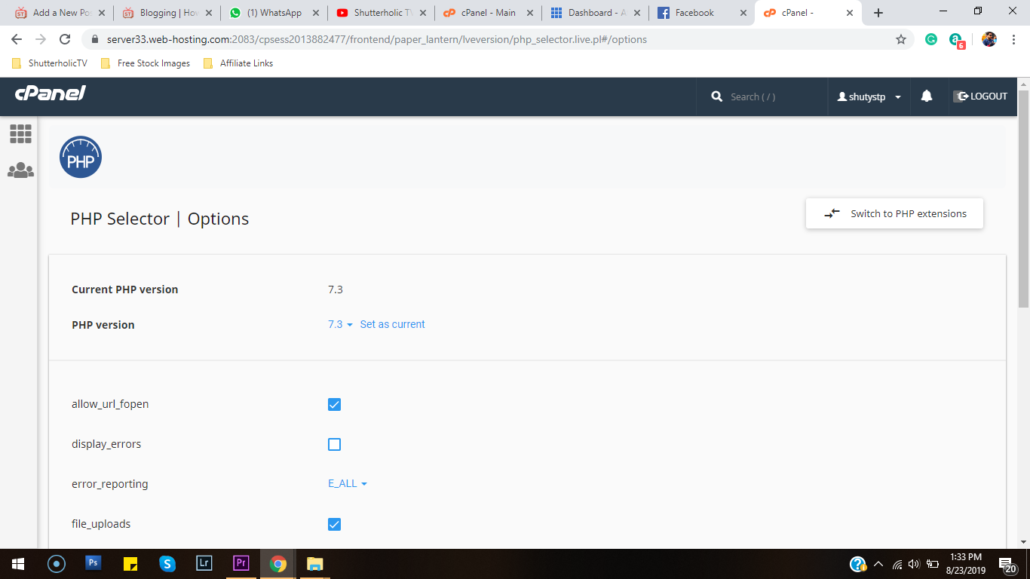
Follow these screenshots below.

I use hosting from NameCheap, so the images are from my Cpanel. The process, however, will remain the same irrespective of the hosting provider.

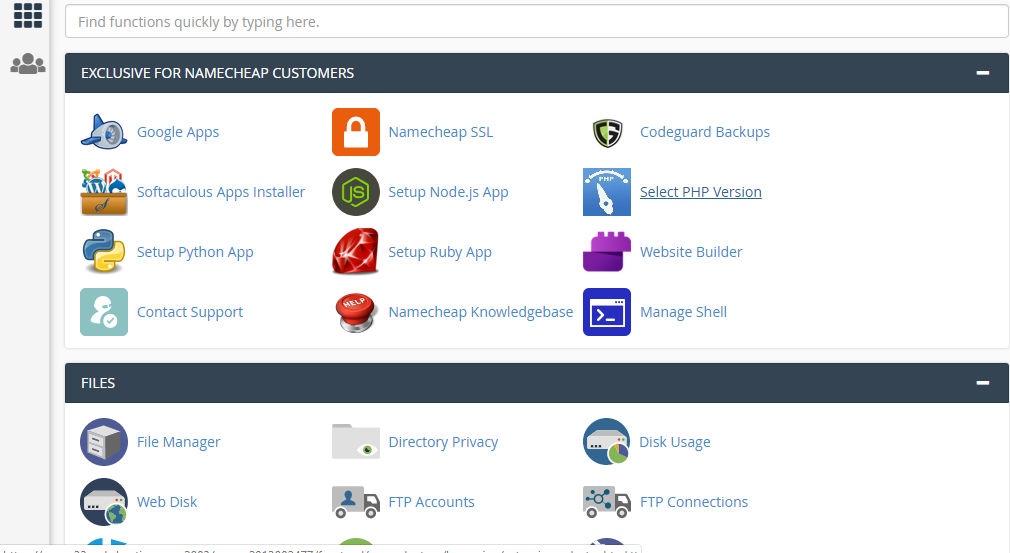
Login to the Cpanel of your hosting.
Login to the Cpanel of your hosting and look for select PHP version.
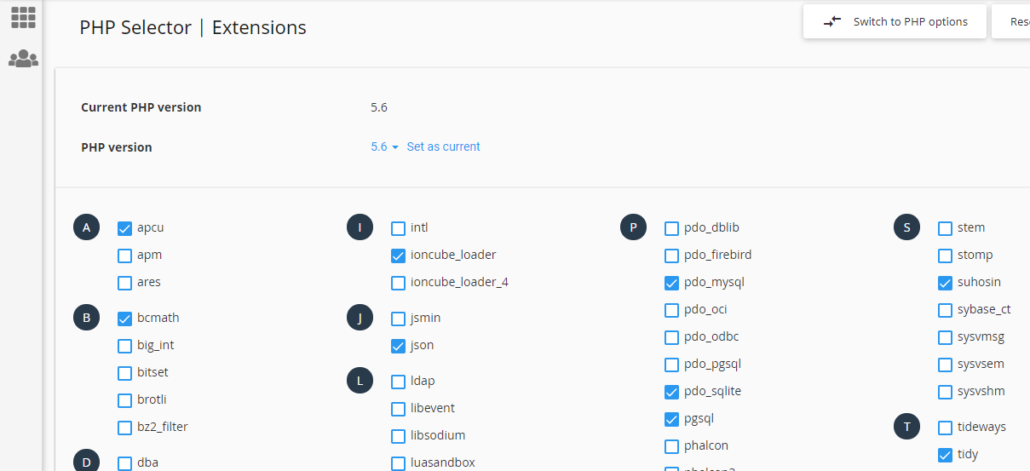
Once you get in the PHP select program it will show you the current version of your PHP
Set the PHP version to 7.3, there you go it’s done. Refresh your dashboard and you will see the difference in the speed.

All done, your WordPress websites should be running on the newest PHP version now and you won’t see the warning again in the Dashboard. The PHP update is really important and I highly recommend you to do it immediately if you haven’t done so. It does not only make your site faster for search engines and for your visitors but also make your website better protected against hackers.

A comprehensive guide for purchasing a hosting plan

Once you purchase a domain name, the next step is purchasing an affordable hosting plan as per your requirements. Before purchasing check this comprehensive guide for hosting plan. If you have not purchased the domain name yet, click on the image below to get a free domain from Bluehost when you purchase hosting for your website. This comprehensive guide for a hosting plan covers all important aspects which come into consideration when choosing to host for your website.

Get free domain with hosting from Bluehost.
Claim your free domain name with hosting from Bluehost.

Your need for hosting will depend upon the type of site you want to host. For e.g., if it’s a blog site, to start with you won’t need to invest much. If you have a business website that you need to host, you might have to purchase a plan which is a little expensive and comes loaded with professional features. Most of the bloggers make mistakes here. Do not just go and purchase a hosting plan without any kind of research. Research well. That’s the only thing which will save you a lot of money and trouble in the future. I did this mistake and had to switch to Bluehost post getting a traumatic experience with earlier hosting providers.

Things to check before purchasing a hosting plan

I had a few important things mapped out in my mind before I chose my hosting plan. This is exactly what you should do. Make a list of your goals or your requirement that you have before investing money in the hosting plans. Once you have a clear vision as to what you intend to accomplish with your blog, then start researching. This will help you in getting an affordable and hassle-free hosting plan. I am listing down a few parameters that you need to keep in mind before purchasing the hosting.

CHOOSE A RELIABLE HOSTING COMPANY

There are a lot of options in the market today when it comes to hosting. Companies with false promises will try and get your website hosted, however they are often accompanied by a lack of support and less uptime. Now, imagine if you are running a business website where you need timely customer support and 99.9% uptime. Companies that promise 100% uptime are a myth. This is because eventually, these companies need to upgrade their systems as well. So once in a year the website will go on maintenance, believe it or not. We just don’t realize it. So someone claiming that they can give you 100% uptime is a pure myth. Look for companies that have credibility and promise you 99% or uptime with timely communication for any downtime upgrades. So look for two qualities in your hosting provider. I looked for the same in mine.

  • Uptime till 99.9%: This way your visitors are never disappointed if the website goes down for a brief moment.
  • Phenomenal Customer Support: This needs to be there. I mean if you are not techy and need help in setting up things, customer support should be able to help you out. Like me, I am not too techy, however still running a blog.

IS YOUR PLAN FLEXIBLE?

This is what I look for when purchasing a hosting plan. There might be a time when you might need to upgrade your plan as per your requirement. Ensure that you chat with the technical support and have basic doubts cleared. Questions like.

  • How easy is it to upgrade the plan in the future?
  • What is the cost involved in the upgrade?
  • In case you want to switch the hosting provider in the future, what’s the procedure?

CHECK THE QUALITY OF HOSTING PLAN

There is so much competition in the market that at times you get confused as to which plan to go for. Make sure that you check and research the quality of the hosting provider. Read the reviews ask in forums & consult other bloggers. I remember my first hosting provider was so messed up, every time I published a post my blog went down. The Cpanel access was useless as port 80 kept getting locked. Make sure that the hosting company provides a secure and robust Cpanel. You should be able to manage your entire website from Cpanel without any issues.

HOW MUCH DISK SPACE YOU NEED

The first thing that you should think about before finalizing the plan is the disk space. It basically means how much storage you would need for your blog site. Once your blog site gets going you are going to need a lot of space for your media and other content. Make sure that you do not run out of disk space. Think long term and not short term. That’s exactly how your goals should be. Long term and not short term. Now if you are running a blog site you might not need a lot of space. However, think about if you have a business website. That would require a lot of bandwidth and storage. Hence even before researching your goals in terms of disk space should be clear. This way you can plan long term goals and not just short term.

PRICE OF YOUR HOSTING PLAN

I would bring this to the last. If you are planning to start a blog, be ready to invest a little in the hosting plan. An affordable hosting plan is what we need, however, do not compromise on the above-stated factors. Believe me, buying cheap hosting with issues is bad as compared to spending a little more and getting a full stacked hosting package with no issues. If you are looking to host your web blog on WordPress, I would highly recommend Bluehost. This company has affordable hosting plans with full stacked features that are needed for a simple WordPress site. Their customer support is good and the services rarely go down. I have personally never seen Bluehost hosting crumple. A lot of my friends use it, and everyone seems to be pleased with the performance. If you want to buy hosting from Bluehost click the banner below.

CLICK BELOW

siteground vs bluehost: Which one is the best?
CLICK ON THE IMAGE FOR A DETAILED COMPARISON BETWEEN SITEGROUND & BLUEHOST

In this comprehensive guide for hosting plan, I have included all the major factors to look at before you purchase any plan. In case you have questions related to this hosting guide please leave them in the comments section and I would love to answer them.

Check out this video on my YouTube channel for choosing a reliable hosting provider.

How to choose a domain name?

Welcome to the first article in my blogging category. The first step in setting up a perfect blog is to choosing domain name. It may sound simple to pick a website or a blog name however, let me assure you, it’s not easy as it looks. Choosing a domain name is the toughest task when setting up a blog or a website. I took a lot of time to finalize my domain name. My first blog was a failure. However, it taught me so much when it comes to blogging.

In this article, I would take you through 10 tips for choosing a perfect domain name for your blog or website. There are ways to this, like e.g. stuffing keywords in your domain name. Also, we are going to take a look at how to choose a domain name extension for your website.

Choosing a domain name is like giving a name to a new business. You should put in a lot of thought and consideration before finalizing the domain name. “That’s what I did before I came up with Shutterholictv.com“

10 tips for choosing a domain name for your website

Should be easy to type

The name for your blog or your website should be an easy word or phrase. I do not recommend using slang or short forms as this might confuse your users. E.g. use of “u” instead of “You”. Basically, do not use slang. Keep the words simple and catchy. Use those words which are easy to pronounce and spell. Easier the domain name easy it is to find for your clients.

A short domain name is easy to remember

Make sure that your website name is short and easy to remember. The longest name in the history of the internet is
http://www.theofficialabsolutelongestdomainnameregisteredontheworldwideweb.international/ . I doubt if anyone will care to remember this or type this. Short website names are easy to remember and your user will tend to remember you. The issue with keeping long website names is that your clients might make a spelling mistake and you will lose out on incoming traffic.

Use keywords in your name

Try to make use of keywords in a domain name. For e.g., if you are trying to make a tech blog, use technology-related keywords in your domain name. However, this is of less relevance now. You get traffic when you use keywords specific to your business but not if the content is poor on your web blog. Check my SEO Section for more details. EMD or better known as exact domain match was something that webmasters exploited, however, Google now pays more attention to content rather than a website name with an exact keyword in your domain. However, I still, recommend this to do as a name can be more user engaging and boost interest in your specific niche.

Use your location

Imagine a website name that tells you exactly where you are doing business from. Suppose if you have a catering business based out of let’s say Delhi. A domain name like delhicaterrers.com would do wonders for you. This would get a lot of traffic from your city, the leads will be defined as people who are looking for a catering business in Delhi will eventually end up coming to your website.

Do not use numbers of any special characters

If you use a number or a hyphen it might confuse your audience. Who knows if you have spelled the number or just included a digit in your website name. Do not use any special characters or a number in the name you are selecting. This will confuse your users and you will end up losing a lot of incoming traffic.

Think out of the box

There are billions of domain names registered. Not everyone gets the attention they want online. Try to be picky, selective, and catchy when naming your website or blog. People tend to forget the boring names and stick to something which can be remembered easily. Do you want to buy a domain, check out these attractive deals on Namecheap.com at just 99 cents.

Research a lot before purchasing a name

Before committing to purchase research the name you have in your mind. A lot of people had to go through legal stuff as they purchased a domain that was copyright, trademarked, or being used by another company. Ensure that you spend at least a week on the research.

How to choose a domain name extension .***

We all know how popular is the .com extension. Almost all big brands and businesses have a .com domain. However, with more people coming into the website business there was a need for more extensions. How to choose a domain name extension? A lot of folks make mistakes here. These days you get a lot of extensions that belong to your niche. E.g. if you are a photographer you can take .photography as an extension. Similarly, there are other extensions like .edu, .org, .biz, etc. let me list a few of the domain extensions and their popular user group. I personally prefer a .com extension always.

  • .co: an abbreviation for company, commerce, and community.
  • .info: informational sites.
  • .net: technical, Internet infrastructure sites.
  • .org: non-commercial organizations and nonprofits.
  • .biz: business or commercial use, like e-commerce sites.
  • .me: blogs, resumes, or personal sites.

Protect your business

It is recommended that you buy all the domain extensions for your business. For e.g. consider you have a domain by the name of shutterholictv.com, which you do not. lol! I recommend buying .com, .in and other searched extensions. This way even if your users type in the wrong extension you won’t lose out on traffic.

Be quick

Catchy domain names sell out quickly. Make sure to act fast and purchase the domain name which you selected. With a frenzy of users trying to purchase the domain name. If you’re having trouble finding an available name, domain registrars like GoDaddy will suggest alternate names during your domain search to help you find the perfect domain name.

Want to buy a domain now? Put the keyword in the box below

Find a domain starting at $0.88

powered by Namecheap

Check out my blogging YouTube channel. The video below has step by step instructions on tips for choosing a domain name.

Video tutorial to getting a domain name for your blog

If you have any questions related to choosing a domain name please leave them in the comments below. I would love to get back to you ASAP.

Hyperlapse Video

How to shoot an amazing hyper-lapse video in GoPro 7?

GoPro 7 Black is the most amazing action camera ever by GoPro. Thanks to Nick Woodman. I wrote an article about how smooth the video is with the hyper smooth feature of GoPro 7 Black. In this article, I would guide you to make an exceptional hyperlapse video from GoPro 7 Black. Let us first understand what is hyperlapse?

Time wrap or better called hyperlapse is hyper smooth applied very efficiently to time-lapse. Even if you move in a scene it allows you to capture smooth video footage in time-lapse mode. However, just make sure that you use a memory card of class 10 and above with over 3 GB of memory.

This is my last video in which I talked about the hyper smooth video in GoPro 7 Black.

How does time-lapse or hyperlapse work?

The camera analyzes the scene to apply TimeWarp based off of your selected speed. It then processes the footage in the camera and produces the TimeWarp video. Below is the resolution to which you need to pay attention while creating a hyperlapse video.

GoPro hyperlapse resolution table

Most noteworthy is the speed at which you need to create a hyperlapse. Speed is different in different situations. The table below tells you what speed to choose in a given situation. These were taken from the official GoPro website and I tested them and got phenomenal results.

Time wrap or Hyperlapse speed variations

Buy a GoPro 7 Black in a discounted rate from Amazon

Click above to purchase GoPro 7 from Amazon and get discounts.

Things to keep in mind while selecting speed.

There are few things which you need to keep in mind while selecting the desired speed. These factors, in turn, make a lot of difference when it comes to perfecting time wrap or hyperlapse video.

  • What is the extent of stabilization you need?
  • How long will be the video footage?
  • How much would you move in the video?

The most recommended and default configuration speed is 10x as it works with most of the video scenarios.

I have tested this and 10x works for me pretty good in most of the cases.

I did a test for all the speeds with different activity and video scenarios. The table below would guide you to use which speed in which situation.

Quick guide for selecting time wrap or hyper lapse in GoPro 7 Black.

Quick tips to make a hyperlapse video.

  • Use 10x speed as this is the best speed which comes by default.
  • Use chest mounts as this mount tops stability chart. Read More
  • Higher speed gives better stabilization as more frames to choose.
  • Zooming in can help with stabilization

Check out the hyperlapse video tutorial on my YouTube channel.