Learning night light photography for newbies
Winters are back again knocking on the front door. So is the festival of lights, which brings joy and a lot of opportunities to click mind-blowing pictures. I like clicking pictures at night as it offers a wide variety of light sources that I can experiment with. Moreover, you can experiment with your aperture, ISO, and shutter speed to get some phenomenal results. Over the last few weeks, I was working on creating this article on night photography. I went out with my cycling buddies and clicked quite a few pictures to make people understand the concept of clicking pictures in low light and still create magnificent art. We are going to discuss in detail night sky photography, night portrait photography, night photography ideas, and hashtags that you can use for amplifying the reach of your pictures on social media. Yes, this article hashtags for night photography that you can use as well.

Let us take a look at what equipment you need and stuff to keep in mind while clicking in low light.
A camera with manual mode
I would recommend a good quality camera. The Instagram image which I shared above has been clicked by a very basic DSLR. Canon 1200 D which was my first DSLR. You can check out DSLR on Amazon.
Basically, you need a camera that allows you to control settings. Features like ISO, aperture, and shutter speed. Most of the mobile devices these days come with a manual mode.
For better quality pictures and for more control over these manual mode settings you can use a DSLR. You do not have to buy an expensive camera an entry-level DSLR would do that trick. I created a video on my YouTube channel for learning the manual mode settings on Canon 1200 D to check this video below.
I use a Google Pixel phone that has an inbuilt manual mode which lets me allow to control ISO, shutter speed, and Aperture.
A tripod or a stable platform for your device

This is the most important component when shooting in low light. Fact that you are using slow shutter speeds you need to keep your camera stable. Most of the folks use good quality tripods. Check out this amazing tripod on Amazon.
However, these tripods can be painful to carry around. What I do is that I use the city’s resources to my disposal and make any surface a tripod as long as it’s not moving.
However, for beginners, I always recommend carrying a tripod for stable shots. Or till the time you are familiar with using the objects around you as a tripod.
Tip: Use an external trigger to click or use the timer feature if you are clicking stable shots.
Get familiar with ISO, Aperture & Shutter speed

Before plunging into low light photography have a look at this cheat sheet for ISO, Aperture and Shutter Speed.
The more control you have over these features, the more your images will come out good. I will explain in short as to what they mean.
ISO for night light photography
A measure of how much light your camera can process is called an ISO. Or in simple words, the ability of a camera to capture light around itself is called an ISO.
Slow shutter speeds need less ISO and vice versa. However, keep in mind that you use higher ISO your image can come out grainy. This grainy effect can be a boon if you are purposely inducing this effect. However, if not the pictures can look bad. Always keep a balance between ISO, Aperture, and Shutter speed for this reason.
I always try to use the low ISO but then compensate for the lighting capture with Aperture and Shutter Speed.
Tip: Use a low ISO if you are not getting too creative with your shot. This can be used primarily for night sky photography.

Aperture for night light photography
In simple words, a small opening in the lens through which light passes in the camera is called an Aperture. Below embedded diagram will clear this further.

The higher the f-stop less is the light and vice versa. So you can play around with the settings and keep low ISO and less Aperture value to get more light. night photography ideas include a lot of settings being altered. The way you play around with ISO, Aperture, and Shutter Speed can get you some highly creative shots.
This is also useful when you are experimenting with night portrait photography.
Shutter Speed for night light photography
The most important component is the shutter speed. If you can learn how to control this you will get a lot of creative shots in low light. Shutter speed is the time for which you want your camera sensor to be exposed to the light.
More the shutter speed less light enters there by making the image look a bit darker and vice versa.
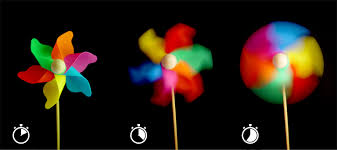
While clicking in low light you need to keep your camera sensor opening for a long time to capture more light. Hence you get creative shots like this.

The below-mentioned image will clear your doubts if you have any. The first picture is with a low shutter speed like 1/250 and less and the last pic is with a higher shutter speed of 8 seconds.

For your night sky photography, night portrait photography and, night photography ideas you need to be patient. This does not come at a first go. It takes time and thinking.
Below are a few hashtags which I found with some keyword research that you can use for maximizing your post reach on social media. Use these hashtags for night photography for better engagement.
#nightphotography #night #photography #longexposure #ig #photooftheday #nightsky #nature #streetphotography #nightlife #astrophotography #photo #canon #instagood #moon #milkyway #naturephotography #travel #travelphotography #landscape #photographer #sky #shots #picoftheday #stars #nikon #instagram #love #landscapephotography #bhfyp
Summing up night photography ideas & night light photography tips for you
Capturing sky’s during night is what I love the most. I do use a higher bit of ISO and compensate my Aperture and Shutter Speed. However, mastering these things do take a lot of time. Especially night sky photography.
The picture that you are looking on my Instagram, took me a few week to get it perfect.
I am also working on night portrait photography that I will share in coming time.
The best way of perfecting your low light shots is to find the right balance between the three pillars of photography that are ISO, Aperture and Shutter Speed.
If you have any questions related to this article or about low light imaging, please drop a comment below and I would love to address all your doubts.


