

Home Blog Page 19

GTmetrix Vs Pingdom vs Webpagetest: Which is the best?

I opened my Google analytics dashboard today. The stats of my website went ballistic in the last week. The new Google update about its broad core algorithm somehow is having a positive effect. I recorded a massive 230% increase in my blog traffic. One important task that I always do is the website speed test. In this article, we will take a look at GTmetrix Vs Pingdom vs Webpagetest tool and its features. Website speed check tools play an important part in amplifying your website SEO.

One of the important tasks that I have every morning is doing the website speed test of my blog. GTmetrix, Pingdom, and webpagetest are the three topmost testing sites.

I do this without fail. So let me show you how I am able to get less than 3 seconds load time of all speed testing tools. Besides showing you the speed stats for my blog, I would also tell you why different website owners choose different speed tools as per their website structure.

So, I got up today and started my blog work by web page speed test. As usual, I went to GTmetrix, Pingdom, and webpagetest to check the speed. I am going to share the stats with you.

GTmetrix
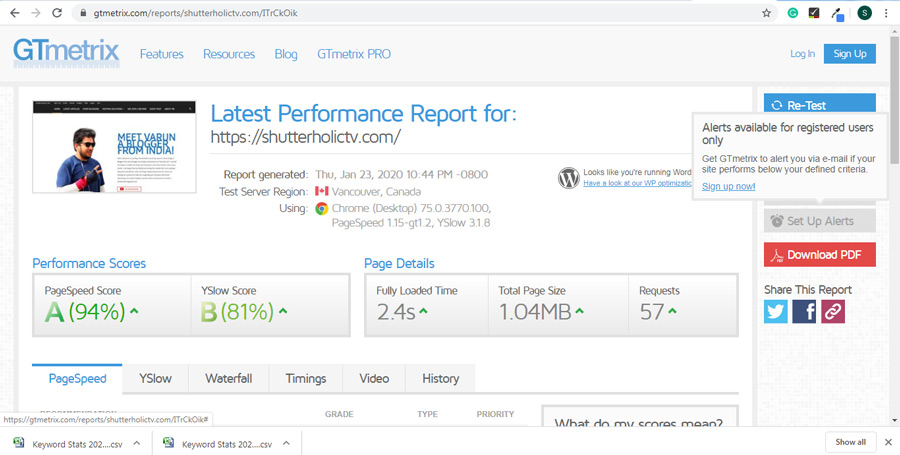
GTmetrix web page speed test gives you a lot of insights of your website.
The page speed of 2.4 seconds is ideal and optimal for your visitors

I am in love with this tool. GTmetrix not just tells me my website load time, but also tells me what areas I need to work on to improve my load speed.

Pingdom
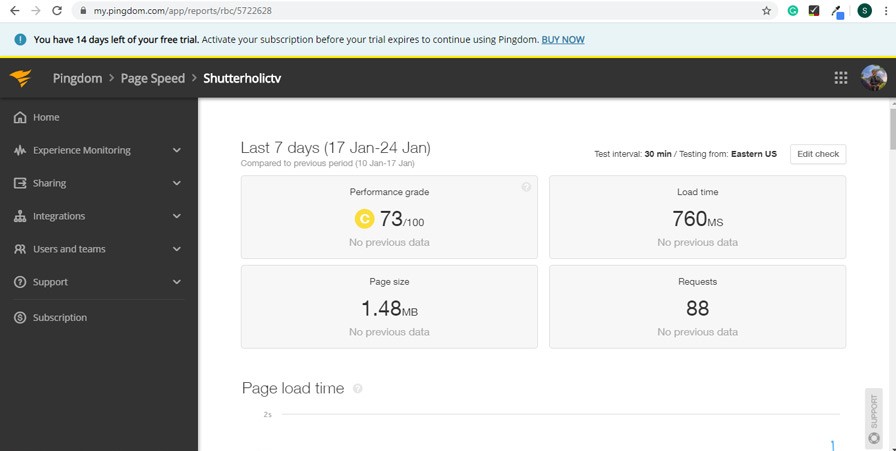
Pingdom stats for my blog | GTmetrix Vs Pingdom Vs webpagetest
So the load time here is 760 MS. That’s pretty impressive

Pingdom is a Swedish website monitoring platform. They were acquired by Austin based solar winds.

Webpagetest

Webpagetest is amazing tool to test your website speed.
Web page speed test done by webpagetest.org for my blog

This is again one of the top three website speed test platforms. Furthermore, this website speed check tool gives out a very detailed analysis of your website.

Now if you think that getting the above results which are excellent is easy, not it’s not. I have worked hard to get this speed. I have optimized and covered every loophole which was increasing my site speed.

At first website speed tests are confusing

Yes, these platforms spit out tons of data and analysis. For someone who just started their website might get confused. Furthermore, you might get confused as to which metric to look at and which one to pass.

EVERY METRIC IS IMPORTANT.

At first, when I started blogging, these speeds were too confusing for me. Even now, if you are looking at the above screenshot almost all of you are confused. Why the speed is shown by GTmetrix is 2.4 seconds, on Pingdom 760 ms and, on webpagetest, it’s 2.17 seconds.

So you might be wondering which one is actually correct? I wondered the same and then started digging down further. Let me show you why these speeds are different, and most noteworthy give you a detailed analysis and comparison of GTmetrix Vs Pingdom Vs webpagetest.

So let’s get techy.

The speeds are calculated based on different indicators. Let me take you through these indicators one by one.

Test Location

Location between your hosting server and testing server also impacts your site speed data.
Test location plays an important part in speed analysis

My blog site is hosted on a server located in Chicago. The distance between the hosting server location and testing server location plays an important role in determining speed. You can check your hosting location here.

So consider this, the hosting server location for my blog is in Chicago. The testing server of GTmetrix is in Vancouver Canada, The location for the Pingdom testing server is somewhere in the western US (They did not specify which city though) and for webpagetest, the location is Dulles VA.

Now let us look at the location distance comparison of their servers from my hosting server location.

Hosting ServerTesting ServerTesting Server LocationGeographical DistanceSite Speed
Chicago, Illinois, USAGtmetrixVancouver, British Columbia, Canada3539 KM2.4 Seconds
Chicago, Illinois, USAPingdomNew York, USA1269 KM.76 Seconds
Chicago, Illinois, USAWebpagetestDulles, Virginia, USA1113 KM2.17 Seconds

The above table shows that the more the distance more is the load time with Pingdom as an exception. Pingdom is an exception as there are more factors to consider while calculating page speed. We will discuss all those articles here.

When you test the site speed with various testing server location speed always varies. This is because a change in the distance means a change in the quality of the network and latency.

So which server location is the best? Answer: Depends on your traffic, If my visitors are from a specific location I would test my site with the server from that specific location.

Let us look at the server locations for Gtmetrix vs Pingdom Vs webpagetest.

GTmetrix Vs Pingdom vs Webpagetest testing server locations
GTmetrix Vs Pingdom vs Webpagetest test locations

Webpagetest is able to have so many locations as anyone can host a location for them on their server. However, each server will have different hardware and hence the difference in the speed because of the difference in performance.

Testing TAT in web page speed test

Testing TAT also leads to difference in the site speed of different platforms.
Let us understand the testing turn around time

Supposing you are checking the speed of your website in any of the Website speed check tools. The moment the tool starts analyzing your website when you click start to the point where the analysis is over, that is called testing TAT.

If you start the testing on Gtmetrix Vs Pingdom Vs webpagetest at the same time, you will be surprised that the testing TAT is not the same for all of them. Different tools decide differently when it comes to stopping website analysis.

Let me tell you why?

The website speed analysis end is determined by two loading mechanisms. These two mechanisms decide when to stop the analysis of a particular website. Let us discuss this in detail.

Loading Mechanisms

Onload Time: This loading mechanism means that the webpage has finished serving all the resources including text, images, and scripts. There might be other requests initiated by some custom coded JavaScript after the onload time that may result in inconsistent load time.

A classic example is of exit pop up. This popup gets loaded when a user decides to leave the webpage. So this resource is not taken into consideration when calculating load time is the platform uses onload time as a loading mechanism.

Fully Loaded Time: This is a measure of when a user comes to your site and your website serves all the content including all script which was not being considered in the above onload time.

In other words, the time when you arrive on a webpage till the time there is no buffering of network activity. In this kind of loading mechanism that load time is generally longer as the testing platform waits for all the resources to load.

Now let us look at these loading mechanisms with respect to our testing tools.

GTMetrix: It has full load time as default with an optional onload mechanism for testing. (My blog result 2.4 seconds)

Pingdom: Onload time mechanism only (Now you know why I got a blazing load time of .76 second. (My blog result 0.76 seconds)

Webpagetest: It has full load time as default with an optional onload mechanism for testing. (My blog result 2.17 seconds)

Another classic example is a slider. When websites using sliders test their speed, the first image of the slider is taken into consideration for speed and the testing stops. However, other slider images still might be loading which is not considered. So choosing the testing platform depends on what mechanism exactly you want to test.

Performance & Speed recommendation in website speed check tools

Web page speed tests will always differ because each of the testing platforms uses its own set of hardware configurations and speed recommendation factors. Take a look at the webspagetest custom 6-speed parameters.

GTmetrix: They use Google recommended 27-page speed contributors & 19 Y-slow page speed recommendations. In case you are wondering what is Y-Slow in GTMetrix, this is Yahoo’s way of speed factors on which they judge high-performance websites.

Pingdom: They use 11 Google recommended page speed contributors in their free version. In paid they use more recommendations however, there is not concrete or substantial data for it.

Webpagetest: In the above screenshot it is quite clear that webpagetest uses a set of 6 Google recommended custom factors. So these platforms use a different set of Google recommended factors individually that make them different and also they give our different speed statistical data.

Extra Features in web page speed test

Every testing platform gives some advance features for testing | page speed test
Let us compare the extra features given by Gtmetrix Vs Pingdom Vs webpagetest

Coming to the final point of speed testing between GTmetrix vs Pingdom Vs webpagetest. These platforms also lure more traffic and users by giving or testing their websites on some additional features or metrics. Let us understand them one by one.

Note: You might need to switch to a paid account with these platforms in order to get these extra features.

Using Real Browser Like Chrome

There a number of website speed testing platforms, however, the three in discussion tops the charts. This is because they use real browsers when testing websites rather than using virtual or emulated browsers.

In this way, they are able to tell an accurate speed of the website bypassing all the emulated or virtual factors. They use Chrome by default which is the most used browser in today’s world. This way they are able to judge what the user will actually see and encounter when they land on your website.

Additional Support form HTTP/2

For people who are not familiar with HTTP/2, this is a revised version of HTTP/1 which was a further refined version of HTTP. HTTP/2 is much more advanced than HTTP/1 and HTTP. Furthermore, this helps in multiplexing and concurrency. Concurrency means the passing of several requests on the same TCP connection.

Also, HTTP/2 supports include benefits like stream dependencies, header compression, and server push. When HTTP/2 is implemented it gives a boost to the website speed. However, for this feature to work both the host and client-server need to have HTTP/2 support on their servers.

As per a study done by W3TECHS around 42.9% of the websites all over the world use this technology.

Hardware configuration

GTmetrix, Pingdom & webpagetest use different server configurations. As a result of which site speed statistics are impacted and are different when using different platforms.

GTmetrix & Pingdom have different guidelines when using different testing servers at different geographical locations. They are so much fine-tuned that the difference in speed from different locations are almost similar.

Unlike webpagetest which lets you host their services as long as you have a server with minimum configuration met, GTmetrix and Pingdom have stringent server hosting criteria.

Connection Throttling

How fast your users can connect with your website on different internet connections will change your site speed statistics. For e.g. someone using a 3G connection might get the website loaded faster than someone using a 2G.

Pingdom does not have this feature where you can simulate different internet connections and test speed on different connections. However, GTmetrix and webpagetest can help you simulate different internet connections to check speed on different metered connections.

Below is the breakup of GTmetrix & webpagetest simulated internet connecting support.

GTmetrix: Cable, DSL, 3G mobile, 2G mobile, and 56K dial-up

Webpagetest: Cable, DSL, 3G Slow, 3G, 3G Fast, 4G, LTE, Mobile Edge, 2G, 56K dial-up, FIOS, Native Connection, and custom speed

Mobile Testing

Almost 60% of the searches in today’s internet world is done on a mobile device. Be it mobile or tablet, it is important for you to optimize your website as per mobile visibility too.

Out of these three website speed check tools, Gtmetrix and webpagetest both give you an insight into mobile testing. Webpagetest has emulated around 14 mobile devices as a part of their mobile testing suite. All you need to do is choose the mobile device to choose the server testing location from the drop-down to test.

Gtmetrix, on the other hand, uses galaxy nexus mobile phones to test the mobile speed. They know that the searches are more on mobile phones than desktops. So they have prioritized their testing server for mobile testing first. However, in GTmetrix the mobile testing is only available for the Vancouver server.

Summing up the page speed test article

I hope I have cleared all the doubts when it comes to the comparison between Gtmetrix Vs Pingdom Vs webpagetest. These website speed check tools are brilliant and give thoughtful insights into your website speed.

Each of these web page speed test tools is different and gives out different metrics based on the factors listed above. Deciding which tool to use can be tricky, however, let me put up a shot selection help module for everyone.

When it comes to…

General Testing of your website: GTmetrix, Pingdom, Webpagetest

Historical Testing of your website: GTmetrix & Webpagetest

Comprehensive testing of your website: GTmetrix & Webpagetest

Location Testing of your website: GTmetrix, Pingdom, Webpagetest

Advance Testing of your website: GTmetrix & Webpagetest

THAT’S WHY I LOVE GTMETRIX WHEN IT COMES TO TESTING MY BLOG.

If you have any questions related to checking the speed of your website please drop them in the comments below. I will get back to you as soon as possible.

Tips To Write Content For Your Website

Your new website! It is almost finished, looks beautiful and technically everything is in perfect shape. The most difficult part is done by the web agency and the only thing you have to do now is the content.

Apple egg, right? Not so. We often see things go wrong. That is why we have listed for you what you should take into account. In this article I would take you through tips to write content specifically article writing tips for beginners in this content writing guide. In the end of the article you can download content writing tips in PDF.

Take your time

You know your company, you know what you want to say so that the website is so filled. In practice, this appears to be more difficult than you think. Take the time to write and post the content. It is unrealistic to think that you will have filled the website within two weeks. Good planning is therefore essential. This is exactly what you will learn in this content writing guide.

The people at Gathercontent.com have posted free manuals with which you can set up a good schedule. It is important that you appoint 1 person within your organization who monitors the overview and keeps the final editing.

Then point out the people within your organization who will produce the content. Are you going to do it alone? Then make sure you schedule fixed days to work on the content.

If you take the time and occasionally put your work away, you create much better content than you want to produce it all in one go.

Stick to content agreements

There is a good reason that you had a new website created. This is for example outdated and is no longer of this time.

Together with the internet agency, you determine which content you want to place where and how; your content structure.

They create a design based on this. Then it is up to you to make the content fit into the design. If you stick to the agreed structure, there is no problem.

It is logical that you want to tell as much as possible about your organization, product or service, but this is not always relevant or possible.

Stick to the content structure

When you start placing the content on your website, it is important that you take into account the content structure that you have previously agreed with the web agency. Otherwise, your text will not fit in the design.

Do not use your old website texts

We often see that customers use the old website texts for the new website, but this does not work. These old texts are often too long and not well written. So start writing again.

Keep it short

Your visitor wants to find what he or she is looking for immediately and not first to talk about something he is not waiting for.

If your story does not fit in a certain block or on a certain page, then link to another page where you explain it in detail or try to shorten your story.

Layout is essential

Visitors to your website scan the page to see if the answer to their search query is there. If they do not find what they are looking for, they will be gone quickly. You can prevent this by making your web texts scannable:

So you get a scannable text with a good layout! It is important to remember that you must format the text in the CMS. What you should not do is copy everything directly from Word into your CMS.

The page then becomes a monster. There is a chance that you copy the layout from Word and you will be left with weird and different fonts.

  • What do you keep in mind?
  • Attractive, substantive headlines.
  • Short paragraphs.
  • Spacers.
  • Enumerations.

What is your message?

Vague texts that actually say nothing. We often see that happen. You want to write creatively, but you create a text that is so unclear that you almost don’t understand it anymore.

It is very important that you keep in mind who you write the text for and what exactly you want to convey. You know the subject you write about inside and out, but is this also the case with your target group?

When determining the strategy, your target group is defined on the basis of personas. These are non-existent, fictional persons who symbolize the different user types of your website.

You can read exactly what it means in our blog about personas.  It is important that you write from their ideas. Start with a fresh start and keep it short, concise, and clear.

By mapping out in advance what your target group wants to know, you create structure in your content.

Imagery

An image says more than a thousand words, but not if you use very standard stock photos.

If your texts are on the website, the images must be supportive. In many cases, however, we see that visual material has no added value, but has only been put there because there had to be a picture.

Another common mistake is that the color of your image blends with the design of your website. Red and orange simply do not match.

Test it out and you know if it fits together. You can download the content writing tips in the PDF below.

I hope this content writing guide and tips & tricks were useful to you. Comment below in case you have a question or a query.

Google Core Update January 2020

Welcome to yet another another article in the year 2020. First of all a very happy new year to everyone. The latest from@GoogleSearchLiaison is that the search giant rolled out google core update 2020 recently. This Google update in January 2020 on Thursday which was 16th of the month sprouted some unexpected results.

For webmasters wondering about the handle of @GoogleSeachLiasion, this is the official twitter handle for Google’s insights as to how the searches work. Follow this in case you want to keep yourself updated with all the future Google updates for searches.

They however quoted that the update might take two weeks to get implemented. However, they have started running this update on mos tof their data centers.

Stay updated with all the latest from Google by submitting your email address.

Google core update January 2020 Summary

Let us view the timeline as per the set of events from Google.

  • Google search liaison announces roll out of their core update on January 13th 2020
  • Google plans to roll out this update in the next couple of weeks, although they have started implementing this of their data centers
  • It is tough to comment on the update and it’s affects till 100% implementation of all data servers is complete
  • This is in continuation to the earlier core updates which were launched in year 2019
  • Once visible change is the appearance of brand logo/company icon or Fevicon in the searches before results.

What webmasters should know?

Google is always changing its algorithm. This is a fact that everyone knows. Daily there are updates which are rolled out. However, these smaller updated are sometimes are not noticeable. Even the impact is not noticeable.

The difference between smaller updates and a core update is that core updates tends to impact searched in a broader way. These core updates not rolled out daily, but once of twice in a year.

Most noteworthy, the Google only confirms these broader updates as these impact the searches in a massive way.

Some websites might get traffic gain, some might loose. However, Google always is ready to help webmasters in overcoming the traffic losses by suggesting fixes. They do this because they know webmasters will look for these fixes.

Questions webmasters should ask after the launch of Google core update of 2020

If your website seems impacted by this update, it is not mandatory that you might have been penalized. However, there might be other websites that might have more refined content that you might have.

We all know the importance of creating quality content.

Google wants us webmasters to question ourselves if the traffic drops after this update. There are many set of questions that they want us to analyze which you can find in this article. However, let us look at these questions at a macro level.

Ask your selves these 6 questions.

  1. Does your content feel original and free from plagiarism?
  2. Are your meta title and description appealing and make user to go through your content?
  3. Is the content trustworthy, error free and, coming from a authoritative website?
  4. Is the content well researched and filled with facts and analysis?
  5. Does it have many annoying ads and does it load on all the devices quickly?
  6. Does your content add value to user experience as compared to your competitors?

The updates coming from Google have always emphasized on quality or content rather than quantity.

Webmaster’s responses so far

I was going through the Twitter feed. Mostly there are mixed responses. Few of the webmasters which understood the update and are in sync with the Google’s update mechanism are OK. The other are quite worried. Few of the website already saw a drop in rankings and hence web traffic.

Let us look at few of the webmasters reaction on this update.

I would not call it a racket as I got a bump in my web traffic

The above tweet is hilarious. I know that this does not happen when you create epic content. Good quality content always wins.

This webmaster was certainly not happy with the changing algorithm. Instead of blaming Google must have worked on their website.

Another one.

So there you see webmaster looking to work in sync with Google are looking for answer rather than blaming Google. Nice approach!

Summing up

The only noticeable change which is visible right now it the appearance of company icon or Fevicon in the SERP’s.

Rest will be unveiled in coming few days. However, the strategy still remains the same.

Think like a user!

This like a user who is looking for information on the search engine and carefully craft your content with added facts, analysis and value addition as compared to your competitors.

CHECK OUT MY ARTICLE ON GOOGLE CRAWL AND INDEXING UPDATE OF MARCH 2020

If you have any question related to this update please drop em in the comments below.

SiteGround vs Bluehost: Which is the best?

Are you looking for web hosting? Looking for the best one to choose? Well, we have picked Bluehost and Siteground hosting services. But, we have confusion about which hosting service is the best. You should be careful when choosing the best web hosting. Choosing the wrong web hosting, unfortunately, affects the search engine rankings and business. That’s why I have posted this article to clarify your confusion. I hope you will get a better understanding of the Bluehost vs Siteground hosting. In this article, let us take a look at a comprehensive comparison between them. We will discuss WordPress integration, hosting customer support, hosting price comparison, and hosting setup process.

We have done complete research to compare the two leading hosting provide Bluehost and Siteground. So take a deep breath and understand the comparison of Siteground and Bluehost.

What online users want?

Below is a small survey that I did on my blog and asked random people about what they expect from their hosting company.

FEATURE% of Users
CUSTOMER SUPPORT35.80%
PRICE25.60%
SPEED10.80%
SECURITY9.53%
EASE OF USE6.10%
RELIABILITY4.05%
UPTIME3.64%
SERVICE2.30%
IT’S FREE2.18%

So people want quality support as compared with other features.

Bluehost vs Siteground Overview

Bluehost and Siteground are leading web hosting services. Both are officially recommended by WordPress.org. Before going for comparison, let us discuss its overview. Then, we will have a clear idea about the Bluehost vs Siteground web hosting.

Bluehost is a leading web hosting provider and recommended by WordPress.org in 2005. Now, it is accessible over 2 million websites worldwide.

It offers a variety of hosting options such as shared hosting, WordPress hosting, eCommerce, VPS, and dedicated servers. It quickly drives excellence and regulates their server hardware. Well, it will improve the user experience and shows the performance.

Siteground, on the other hand, has decent web hosting services. It gives hosting services to location specific hosting for 3 data centers. Gamut is the hosting option that decides to run the shared hosting services. As a result, it works independently like a fully equipped dedicated server.

Comparison between Bluehost and Siteground Hosting

I have discussed the comparison by seeing its features, performance, and ease of use. Both providers deliver the same performance but with distinct operations.

They both have an almost equal customer base. Bluehost and Siteground are beginner-friendly and scalable. Users can experience a good hosting service by picking the best two web hosting services.

Domain purchase feature of Bluehost and Siteground

You get free domain with BlueHost but not with SiteGround | Hosting price comparison
Get a free domain name with Bluehost unlike SiteGround (Note: Free domain name worth up to $15 only)

At first, the domain feature for Bluehost has an attractive name for lots of users. The domain name in Bluehost has a money-back guarantee and registration free up to $15.99. It is a good role to target the audience globally. Even you cancel the plan with Bluehost, domain name works smoothly. Your plan will not expire until the renewal comes.

Likewise, the Siteground does not offer a free domain. But, you can get a daily auto backup on price plans. It can easily restore websites and others. You have to recharge for a domain name with Siteground. Before the startup, it becomes free and upgrades to the higher tier price plans.

Bluehost vs Siteground: Which has better WordPress integration?

Both SiteGround and WordPress provide seamless integration with WordPress
Both hosting companies provide integration with WordPress

WordPress is the major online presence for web hosting. It uses nearly 36% of the internet. Having WordPress has surprising benefits and build the site easily. It has created a list of hosting providers and pick among them. So, Bluehost and Siteground have WordPress to host the websites effectively. Choosing the best hosting service is a bit difficult challenge. You have to analyze thoroughly before picking web hosting.

Fortunately, both Siteground and Bluehost have a strong WordPress focus. It offers quick installation and 24 hours support with updates. They will maintain the sites professionally and gives a stunning appearance. With lots of benefits, websites will turn into leads by having a tailor-made security feature.

Bluehost vs Siteground: Customer Support

SiteGround has 24 hours chat support unlike Bluehost. Hosting customer support is better with SiteGround.
SiteGround is much better when it comes to customer support

While running the websites, sometimes an error may happen. Solving the errors and fix the problems is a burden. That’s why it is important to decide on great hosting customer support. However, hosting customer support is a boon for website hosting. You can always go ahead on the leading competitors like Bluehost and Siteground. Both give 100% satisfaction when it comes to hosting customer support. But, we should check the main difference in how accessible and useful for others.

Bluehost Hosting Customer Support:

Bluehost web hosting service has strong customer support. People can get a solution from contacting the professional staff. It includes live chat, call, and tickets. So, it is valuable for customers to get error fixing techniques by 24 hours of customer support. But unfortunately, Bluehost does not have 24/7 live chat support.

SiteGround Hosting Customer Support:

Another hand, Siteground has equal customer support the same as in Bluehost. Luckily, Siteground has 24/7 live chat support. They have impressive systems to ensure the best and fastest services for all. Users will get an automated response from the Siteground web hosting service.

Bluehost vs Siteground- Hosting Price comparison

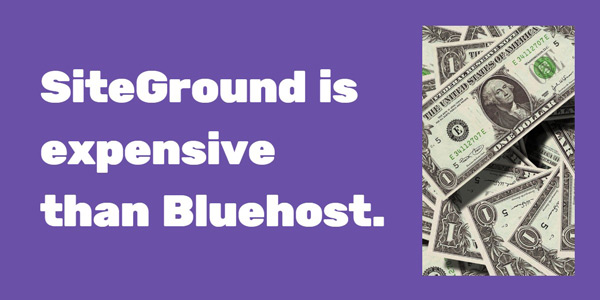
Hosting price comparison | SiteGround is more expensive than Bluehost, however I would say that's justified looking at the quality of service.
Hosting price comparison says that SiteGround is expensive than Bluehost

Pricing is the best thing to keep in mind when picking the web hosting. Bluehost and Siteground have separate pricing plans. Users should choose according to their demands. Also, check for affordability and can opt for shared hosting plans. With every shared hosting plan, pricing may differ. So, it is better to discuss its comprehensive difference between the pricing plans of Bluehost and Siteground and do a through hosting price comparison. Hosting price comparison also helps in planning your website budget.

Both Bluehost and Siteground offer a 30-day money-back guarantee option. If you love them, you can find the best one. When comparing both, Bluehost has a better pricing plan than Siteground. It is worth and useful for spending money. Of course, Bluehost plans are cheaper than Siteground. So, you can pick under your budget.

Below is the hosting price comparison between Bluehost and SiteGround.

HostingSharedCloudWooCommerceDedicated
Bluehost$2.75/Month $6.95/Month $6.95/Month $79.99/Month
SiteGround $3.95/Month $80.00/Month $3.95/Month $296.00/Month

Both BlueHost and SiteGround provide a range of value-added features. They provide the most effective functionality than the average WordPress host. In order to implement this process, the value-added features are effectively utilized. On the whole, they are pretty even on the feature front via BlueHost provides you a slightly simpler dashboard. It is mainly to use those features for providing a slight edge.

Hosting setup process: Features of BlueHost:

  • Unlimited bandwidth and storage on most of the plans are available. The basic plan consists of the 50 GB storage limit
  • Custom hosting dashboard is the main feature but still, you can still if required
  • The built-in caching system is utilized to increase the speed of your website
  • WordPress updates are automatic
  • Free SSL certificate through Let’s Encrypt that will help you to make your website to be secured with HTTPS
  • Most plans, one can able to host unlimited websites
  • The modern technologies it supports are PHP 7.0
  • Most effective WordPress staging websites for testing

When there is an enormous number of a similar feature, there is one area where BlueHost tops. That area is a custom hosting dashboard. This provides a user-friendly interface for beginners to manage the required aspects of your website.

Hosting setup process: Features of SiteGround:

  • Like BlueHost, Free SSL certificate through Let’s Encrypt
  • Automatic updates are provided for the WordPress core software
  • Host number of websites on the important plans
  • The built-in caching system is utilized to turn out your site to load very fast
  • Most effective Cloudflare CDN integration is provided for quick global page load times
  • 10 to 30 GB website storage is available based on the plan
  • Simple staging websites
  • Modern technologies are used here that includes PHP 7.2 and HTTP/2

To access the above-mentioned features, you have to make use of the standard cPanel dashboard. This makes it very much ultimate and most unique.

Important factors:

Both the BlueHost and SiteGround can able to make it simple to create the new WordPress website. But the SiteGround makes the migration process very simple. Apart from the functionality that you checked out about, both BlueHost and SiteGround are consists of the user-friendly process. It also offers the most generic auto-installer to assist you to install WordPress for providing the best wizard tool. This tool pops up on your initial visit that makes the process to be very user-friendly.

They also offer the most extraordinary 24/7 support through email or ticket, live chat, and phone. As it is said, but there is a difference that occurs when it comes to supporting the quality of these hosts. Most of the WordPress users also suggested that the support process is best in SiteGround very effectively.

  • WordPress-specific support quality
  • Overall support quality

The hosting setup process of BlueHost:

This BlueHost is best in providing the most ultimate tool to help you for creating a new WordPress website:

  • This host is not providing any kind of free migration service
  • While BlueHost making it very simple to create the new website, you will require to migrate the site manually. This can be acceptable when you are looking to move the existing website to BlueHost.
  • BlueHost also providing the premium migration service that can able to move around five websites.

The hosting setup process of SiteGround:

By making use of the SiteGround you can able to grab the tool which can able to help you by most effective ways:

  • You can able to install Joomla, WordPress, Weebly or Drupal
  • Even you can consist of the SiteGround install WooCommerce for you in case you are required to create the eCommerce store with WordPress.
  • Transfer the accessible website.

This process also recently launched its own SiteGround Migrator plugin for the effective hosting setup process. That plugin makes it simple for everyone – especially non-technical users to migrate the unlimited websites of WordPress to SiteGround. This host can able to effectively migrated one site for you on the higher-tier plans.

Performance of BlueHost and SiteGround:

There is research has gone through and it has been found that SiteGround provided better performance. It can provide faster page load times when compared with the BlueHost. Below, you can find a summary of the data based on research conducted through Pingdom from different locations.

BlueHost:

  • Tokyo: 2.87 seconds
  • San Francisco: 2.86 seconds
  • Washington D.C.: 2.75 seconds
  • Sydney: 3.73 seconds
  • London: 3.43 seconds

SiteGround:

  • Stockholm: 1.390 seconds
  • New York: 0.645 seconds
  • Melbourne: 1.563 seconds

Ahead of page load times, it is also very much important that your website is consistently available to the visitors.

When to choose BlueHost?

Both the hosts can able to provide you a great job with its most effective functionalities. Sure you won’t get such type of functions from other cheap shared hosts. For instance, each provides staging sites, a really easy setup wizard and built-in caching that helps in creating the new site.

By considering this, the BlueHost process is somewhat user-friendly. So, in case you are searching for the best user-friendly experience, then sure this host is the perfect option for you. Also, this host’s plans are cheap when you consider the free domain name. So, if you don’t want to spend more money, then BlueHost is suitable for you.

Finally, I recommend you BlueHost, when you are looking for an affordable and beginner-friendly host.

When to choose SiteGround?

Web Hosting

Apart from an affordable and beginner-friendly host, if you concentrate on support and performance, then SiteGround is the best option for you. As it is already mentioned, SiteGround provided better performance than BlueHost in the page load tests.

This is most needed since the page load times will create a huge impact on the experience of the visitors. It also consists of certain higher support ratings based on the survey of the WordPress hosting. It will suggest you get the most effective support from the SiteGround.

Overall, in case you require the best support and performance, sure I will recommend you SiteGround

Conclusion

I hope this article helped you choose between Bluehost and Siteground web hosting. Both Bluehost and Siteground is a leading provider with full packed performance. Both have excellent features and functionalities. They both work well for web hosting and recommended for everyone. Their hosting setup process is easy for anyone new to making websites. If you want to start a website, check the comparison discussed above. So, it let you get the best services for your website. Spend only a little time and find the difference between Bluehost and Siteground. Both have amazing performance and features. They are the best competitors in web hosting services.

How to define domain name server

The next step of setting up your WordPress blog is defining name servers. This of your domain as the name of your house and hosting as your house address. Now you need to associate your property name with your address. This is exactly what we will be talking about today. This is an easy process. I will guide you step by step as to how you can do this from your domain dashboard. We will also learn about domain propagation in this article.

What are the name servers?

A name server is a server on the internet. This server specializes in handling queries with respect to a domain name’s various services.

For e.g. my domain name is Shutterholictv.com. I give out information related to SEO & Blogging. This information is on the name server of my hosting company. This is the simplest explanation of a name server.

This work is too easy so I will not get too descriptive here. Let us just go ahead and define the name server for your WordPress website.

Check email from hosting provider

The first task is to check your email once you purchase hosting. You will get a bunch of emails from your hosting provider from their support ID. You will get your receipts and information related to your hosting.

Details like hosting Cpanel & your name server address.

I was with Hostgator for a year and realized my mistake. When it comes to hosting I trust only on SiteGround. Check more about SiteGround hosting here.

I am going to show you an old email from Hostgator which I received for my name servers.

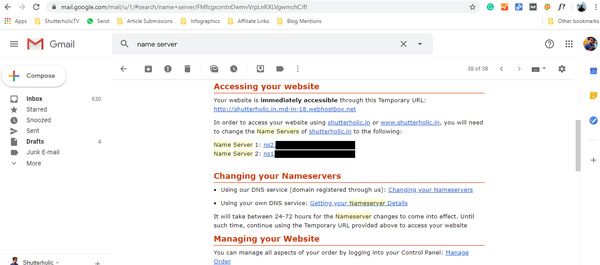
Look for an email from your hosting provider for your server details.
Email from hosting provider having the details of name servers

If you look at the above email, you will see that Hostgator has clearly mentioned the name servers. ns1.server.com and ns2.server.com. The pointing domain to hosting is easy. All you need to do it copy these name servers and paste them in your domain dashboard.

Open your domain dashboard

The next task is to open your domain dashboard. I have my domain from a different registrar and hosting from a different company.

This is because I got the domain name cheap from Bigrock & hosting from SiteGround.

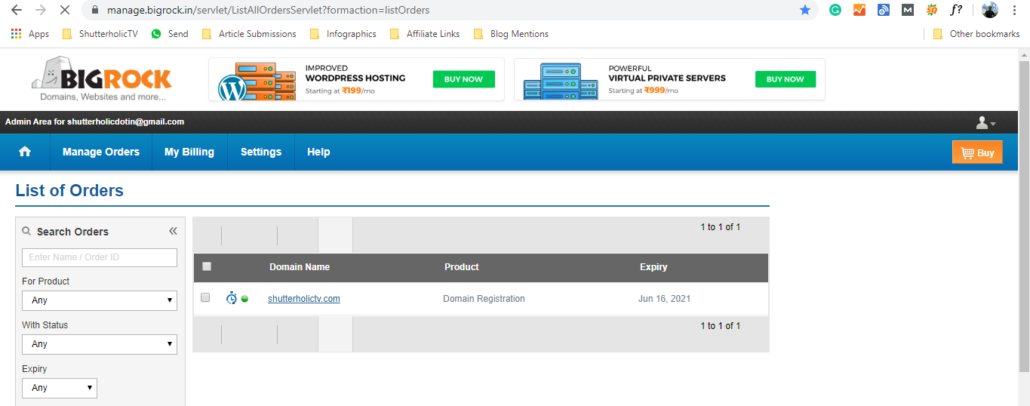
Once you open your dashboard it is going to look like the image below or similar.

Pointing domain to hosting require you to key in the details in your domain dashboard.
Hosting Panel or Dashboard

Pointing domain to hosting require you to key in the name server in your domain dashboard.

Now in the above dashboard, you can see that I have the domain shutterholictv.com till 2021 December.

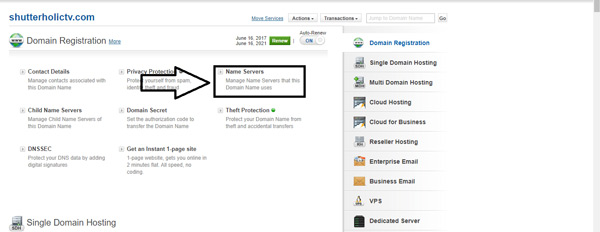
To set the name server click the domain name.

You will be directed to another page which will have multiple options.

Screen from where you can manage your domain name
The screen where you can manage your domain name

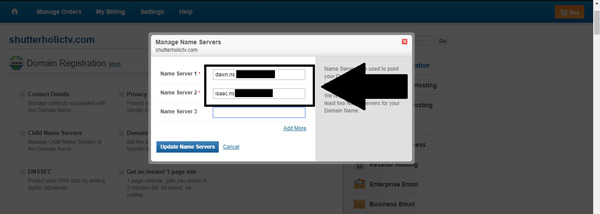
As you can see above, you need to click on the name server. Once you click you will get a small popup with the fields to input your name server details.

Pop window in the domain dashboard.
Enter your name servers

Copy and paste the name servers details from the email you’ve got from the hosting provider in the pop-up window of domain dashboard and click update your name servers.

Do not look at the name servers which I keyed in. I have purposely changed them as normal name servers and CDN name servers are different. I will take this up in another article. You need to key in the name servers which your hosting company has provided to you.

So that’s it, setting up name servers is done. Quite simple task, isn’t it?

Defining name servers & domain propagation

Once you update the server name it takes usually 24 to 48 hours when all the available services of the DNS start working. This time period is called propagation.

I have seen domain propagation happen in 10 minutes and sometimes taking complete 48 hours.

To be honest domain propagation time frame usually happens within a couple of hours these days or less.

So once you have successfully updated the name servers sit back and relax, your website will be up in no time.

So once your website is up and running, it is time for you to make content. Check this article to make epic content.

If you have any questions related to the pointing domain to hosting please leave them in the comment section. I would love to answer them.

What is CDN?

The purpose of an authoritative website is to serve content all over the world. However, this comes with a predecided notion that the content should be displayed in less amount of time. If your website does not load within 3 seconds 53% of the user bounce off. Google has already established this fact.

Let’s talk about much-discussed CDN or better called a content delivery network in this article. Now, since I use WordPress we will talk extensively about WordPress CDN and how it affects the content distribution network.

Hosting providers give CDN for free these days. Content Delivery Network is a network of CDN cache servers that are placed in sync all over the world. These CDN cache servers are placed strategically to provide the users with website data in the least possible time.

This helps in reducing the website load time. This is irrespective of the physical location of the request. CDN routes the data request to the nearest possible data server from the site of origin. CDN is one of the finest technology in recent times for reliability, good performance & website speed.

Is a CDN the same as a web host?

There is a difference between these two. A web host is a server that hosts web pages. Similarly, CDN keeps the cached copies of the data on CDN cache servers. With the usage of CDN, the data load on the web hosting server is reduced many folds.

What are the benefits of using a CDN cache servers?

CDN provides a lot of benefits for websites with heavy traffic. Even for people using WordPress websites, CDN is fabulous. WordPress CDN makes the WP websites fast and also adds security to the existing structure. This helps in leveraging content distribution network within the website structure as well. If we were to list the benefits of the content distribution network, we would say below are the three important ones.

  • Uptime: As a total load of requests gets distributed among many CDN servers, the main host server is devoid of the entire load resulting in better uptime.
  • Speed: The prime task of CDN is to get data delivered to the client in the least possible time from the neared CDN edge server. This results in faster retrieval of data and better response time.
  • Economical: Each request of data on the main server consumes data bandwidth inflating the charge to the customer. With CDN support, request gets distributed to various server saving a lot of money.

How does a content delivery network or CDN work?

Structure of a content delivery network or better known as CDN
This is how the content delivery network works when distributing content

Consider the above example. If we were in Iran and if we were looking up for some information which is hosted in a server located in France, it would take some time. However, If the website uses a content delivery network then the copies of information will be on the CDN cache servers. This will reduce the time to fetch the information considerably.

CDN cache servers are also referred to as Points of Presence or PoP. These are placed at different geographic locations. When information is requested from a browser or any other medium, CDN locates the source, finds the nearest available PoP, fetches the cached data and delivers to the client. This entire process is aimed towards faster delivery of content and lowering the bandwidth on the main server. 

How does a WordPress CDN improve WP website load times?

For WordPress websites without the WordPress CDN service, there is only one point of data processing.

A web host that is situated at any single physical location. Irrespective of request origin, the data packets have to travel the entire path with the risk of packet loss.

With the implementation of WordPress CDN, the delivery path does not extend to the web host, rather CDN helps to deliver data from the nearest WordPress CDN server. Our blog site had this problem before we implemented CDN.

Our readers abroad in countries like the US and Australia complained about the website not loading quickly. Furthermore, when we checked this issue from other locations we found that this was actually true.

The next thing we did was, we got free CDN through Bluehost. Later on, when we switched to Sitegournd we got the WordPress CDN free with the hosting.

Reliability and Redundancy – How does a content distribution network keep a website always online?

The first task of CDN is to serve content to the user quickly. Most noteworthy from the nearest available cache server.

Hosting providers make this happen by placing multiple cached copies of websites on different CDN cache servers at different geographical locations.

So the data on the website is at multiple locations and is always live of different servers. This process removes and redundancy for sure and is also reliable. 

Data Security – How does a content delivery network protect data?

In the case of CDN-enabled routes, traffic is never fulfilled by the web server, rather the load is distributed among many CDN servers.

This helps in filtering out the DDoS attacks on the server. These nodes are in compliance with TLS and SSL certificates and make sure about the encryption of traffic.

Apart from these, CDN also features secure tokens and hotlink protection for an added layer of security.

How does a content delivery network reduce bandwidth costs?

Whenever a request is made to a web server, bandwidth is consumed. If CDN is in play in between, it eliminates many initial investments and other maintenance charges.

As all the information is fetched from CDN servers, the bandwidth of the webserver isn’t consumed to that large extent saving a lot of money. One is also saved from upgrading to a bigger and expensive hosting plan when the site traffic increases in due course.

Our site uses CDN for serving content and we have seen a tremendous amount of speed gain over time. Furthermore, CDN also helped us to add more security to our blog. We would recommend using SiteGround as you get free CDN along with the hosting.

Furthermore, do check out Wildcard SSL as it allows you to secure unlimited domains for a very nominal price.

If you have any questions please leave them in the comment section below.

10 Tips to make SEO friendly E-Books & PDF’s

SEO friendly E-Books and PDF”s are a new and very effective way of creating backlinks. Unfortunately, I started creating E-Books and PDF’s at a very later stage. I should have done this from the start of this blog. I do not want you guys to make the same mistake, so start early. Optimizing PDF files is a bit different from normal page SEO, so pay attention here.

Does Google read your PDF’s or E-Books?

Once upon a time, it was thought that Google can not read any of the PDF’s or E-Book’s content.

Similar to the way that Google can’t read images and you have to use Alt Text. However, when talking about PDF’s it’s a different story altogether.

SEO friendly E-Books and PDF’s is not a myth anymore. Google reads them and better than us.

Unlike you might think that Google cannot read a non-HTML document, its the other way around. Google started reading PDF’s and E-Books back in 2011. If you remember I wrote about the Google updates in the year 2011.

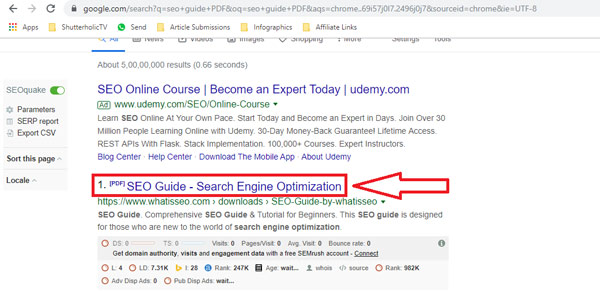
If you search for a guide in Google search you often get results with tags. For e.g. look at the image below.

PDF tag in Google search
Google already tells you that the link is a PDF file

If Google is reading all your documents, then the question is how do you optimize your files?

Optimizing PDF files is a different ball game. I would say that the SEO parameters remain the same, however, it differs from traditional page SEO methods.

Let me show you how I have leveraged some of my SEO knowledge for optimizing PDFs for searches.

The file name game!

Naming a file is important not just while creating PDF’s but when every you are creating any sort of file. Google reads them first to get an idea of what the content is all about.

name your PDF file. That's how Google will know what the PDF is all about.
Make sure that you do keyword research before saving the PDF file.

I would suggest you do some keyword research before you name your PDF document. Google is going to look at your file name first so make sure that it has your chosen keywords.

Also, this file name will be at the end of the link, and we all know the relevance of an SEO optimized URL’s. So, make sure that you have keywords in PDF’s name.

Most noteworthy, make sure that the first letter of each keyword in the PDF’s filename is in caps.

Internal linking of your PDF’s

In my previous articles on SEO 2019 & beyond we talked about the importance of internal links. Similarly, you do not want to keep your PDF’s aloof from other pages, posts of links.

it is important to link your PDF internally with multiple pages, posts and locations | SEO friendly E-Books & PDF's
Your PDF should not be an orphaned document

At the end of the day, we should have an orphaned PDF or E-Book linked to nothing on your website.

These documents are meant to be downloaded by your visitors, so these are high-value resources on your website. Visitors should have access to these documents at multiple places.

You will get a lot of SEO boost provided you link the document to the correct topic of discussion & using the apt anchor text.

Link the document with a strategy

Do not go around randomly linking documents to content which is not relevant to your document. Google hates this and your content might not be seen in the searches ever.

Also, while creating PDF”s make sure that you are embedding links in the documents. Your PDF is a high-value asset that might be linked to by a lot of websites. This will get you a ridiculous amount of organic traffic. Besides the fact that you will be gaining authority and ranking.

Optimize the title in your PDF

This is perhaps the most important part of optimizing your PDF’s. This is the most basic task to do when you are doing SEO. If you remember I did that in one of my previous article which was about creating title tags.

Place where you can add title tag and keywords for your PDF document | SEO friendly E-Books & PDF's
The place to add title and keywords in PDF’s

The above image shows how you can add title tags in your PDF file. It also allows you to insert keywords for your document.

Now a title for SEO friendly PDFs can be set in the “Document Properties”. Google looks at the title the same as it looks at title tags in HTML pages. If you look at the screenshot above in starting the link after PDF tag is the title which we are talking about.

This should compel the user to click on the link to get access to your PDF.

Optimizing PDF files for mobile

You must be thinking that PDFs are by default optimized for mobile. This is the truth, however, I am talking about something else here. SEO friendly E-Books or PDFs are not optimized for mobile by default. There are few things that should be kept in mind while creating these.

PDFs are not by default optimized for mobile

Make sure that the size of your PDF document is easily downloadable on mobile. A heavy document will take a lot of time to download and the user will lose its interest.

Ensure that the images are compressed to the utmost minimum without losing their resolution.

Mobile generally serves content which are in bytes, heavy content loses its value as no one likes to wait in today’s world. So make your PDFs light.

Image Optimization

Your PDF will have a lot of images. Moreover, the importance of infographics is well known to us. People like infographics more than normal text.

This is exactly why you need to have a lot of images in your PDF. However, make sure that you do not use heavy images in your PDF. Optimize your images to the lowest storage capacity without compromising the quality of the images.

I use photoshop to compress my images. I have tried online converters too, however, nothing works as good as photoshop. Optimizing PDF files include this very important task of optimizing images. Do not overlook this task.

Break up your content

Your PDF will be packed with a lot of information. Along with using images make sure that you break your content to make it easy for your visitors to understand.

A proper combination of optimized images and text where ever necessary is required. Do not write lengthy paragraphs. I would suggest not more than 3 to 4 lines in a paragraph.

Also, ensure that every important point is written in proper heading formats. These headings and subheadings are important. These will grab the attention of the user in the first go.

Use text and not just images

Your PDF will have images that are by default. However, I suggest that do not keep all your text in an image that Google can’t read.

We can read the text in the images, however, Google can not. Google bots just look are the alt tag of the image.

Google is getting better in reading images however it is the text which is preferred by Google bots.

Use images, but try and use the text outside the image in the PDF body and not in the image. Google will be able to crawl your PDF much better.

Alt text for images in the PDF

What if I tell you that you can set alt text for all the images in your PDF. Yes, this is possible.

All the images which you are using can be optimized with certain software. I am not talking about the title of PDF which you can optimize as discussed earlier in the article.

This is different!

How? Well, there are ways and software by which you can do this. There is an interesting guide by W3 on setting alt text for your PDF images.

If your ranking does not improve by setting title in the PDF, you can certainly make use of your images and write alt text to boost your ranking.

Performance Tracking of Your PDF

I love doing this. This tells me how my PDFs are performing on incoming traffic? How many people are downloading my PDFs? What path are they taking to reach to my PDF?

All these questions have the answers hidden in Google analytics. You can set goals in analytics to track these granular performances. This will give you amazing insight into your website performance.

Consider a visitor which downloads your PDF, he/she is going to be a permanent visitor to your website. This also helps in increasing the return visitor count.

So, folks, this was all about the SEO friendly PDFs. Whatever we discussed herein will help you in optimizing PDF files for your website. If there is something that I missed please let me know in the comments section below. This would help in revising this document.

Website Authority Business Model

You must be thinking that I have already written about authority earlier, then why am I repeating the topic again. However, folks, this article is about site authority and not about domain authority. These are two different things, and people while looking for information generally tend to confuse themselves with these two terms.

In this article, I will show you how to build the authority of your website. In other words, our focus will be to build a trusted website rather than just dumping your quality content on your website. A trustworthy website takes time to evolve, however, once you build this trust, you start getting ridiculous amounts of organic traffic.

Building Authority Sites require time and patience, let me guide you step by step to create something which will make you quit your 9 to 5 job. How to build a trusted website? If that’s your question you will get all your answers here in this article.

I always wanted to be a digital nomad. I wanted to open my laptop every day in the morning look at my earnings and enjoy the life I always wanted. However, when I tell people that I am living this life, they envy me. No one knows the amount of time, money, and brain I invested to keep this blog alive. Even before I started earning from my web blog, I had to establish its authority.

What is the site authority & how to build a trusted website?

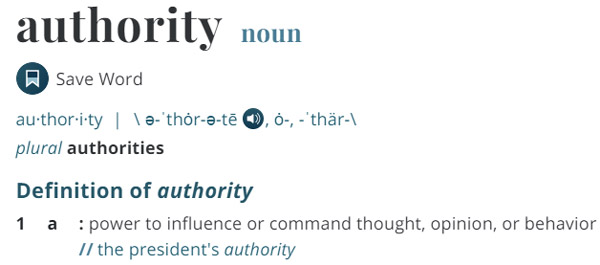
If you start googling articles related to site authority, you will get tons of results on the first page about increasing domain authority. None of them talks about how to create a website that is an expert on a particular subject. Take a look at the definition of authority as per Merriam webster.

Definition of the word Authority as per Merriam Webster website.
Definition of authority

In website terminology, the above definition will imply that your website is a trusted source of information. Your website has information that people look for, share, and recommend to others.

For e.g. whenever I look for SEO articles I generally go to Neil’s website. Neil Patel is awesome when it comes to modern SEO techniques. Another example would be the shoutmeloud website of Harsh Agarwal. Shoutmeloud is another trusted website when it comes to WordPress and SEO.

In a nutshell, an authority website is a site that is packed with information relevant to a particular subject and is a known source of expert advice.

Anyone who is interested in blogging and wants to get rid of their 9 to 5 job should actually be looking at creating an authority site, instead of just setting up a blog. Once you have this authority site up, then you can start monetizing it. We will talk about monetization in a while in this article.

Anatomy of a trustworthy website

The main commodity in these authority sites is information. These are content-driven respect sources of information for visitors. Since these sites also generate revenue, these are kind of small businesses.

This is the most convenient job for me when it comes to becoming my own boss. However, you need to invest a lot of time and do a lot of research before you could set up anything like this.

Information is the commodity in these kinds of sites, so you need to invest a lot of time in creating quality content, spend time doing SEO, and then build various channels of incoming revenue streams.

I always looked at blogging as a business on which I could thrive. Most noteworthy, thrive without getting into a lot of mess. This task if you look at is easy. Easy because.

  • You do not have to maintain an inventory
  • You do not have to interact with your visitors every time as in customer service.
  • Once content is created and you are on top of the list all you need to do is keep on revising the content

Traffic sources of an authority website

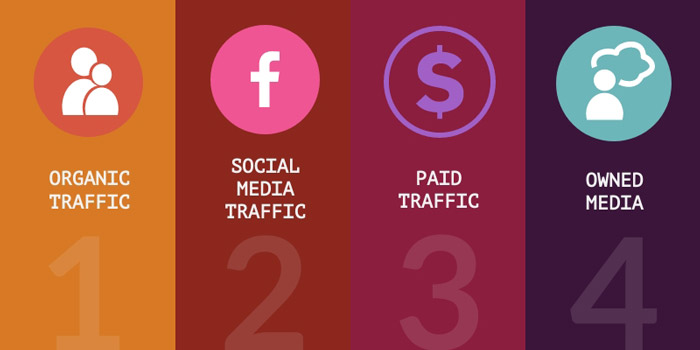
I always believe in setting up multiple channels of traffic. So if there is a drop at one source you do not take a substantial hit on your overall traffic. For any website which is filled with meaningful information, there are four sources of traffic.

  • Traffic that you get by doing periodic SEO or in other words organic traffic
  • Social media gets tons of traffic to your site and is an important source of visitors
  • You can run paid advertisements for your content to get more traffic
  • I also use my social media platforms like YouTube channel, Facebook, Twitter, Instagram to promote my content
This image tells us about the four sources of web traffic for your site.
Four sources of web traffic of an authority website

Moving parts of a trustworthy website

Authority sites are a bit complex than your normal blog sites. These websites have moving parts that need to be perfectly aligned with each other. Creating a blog site is easy, however, authority sites require you to master these moving parts. This is because you need to understand the terminology, your niche, and your visitors.

This image tells us about important pillars in a information rich site.
Your authority sites need these components
  • Regular blog posts on your blog page
  • Create videos regularly for your site and for your YouTube channel
  • Podcasts are a new way of expressing your selves
  • Images & infographics are eye-catching and drive more traffic
  • The layout is important to build a trusted website. User should be able to navigate with ease

Revenue sources of your trustworthy website

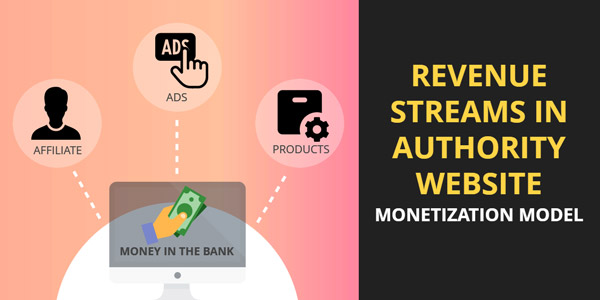
Now once your authority website is up and running and getting traffic, it is time to earn from this traffic. Primarily, I use three channels to generate revenue from my website.

Building Authority Sites | This image tells us about the way by which you can earn and build a website.
Three revenue sources of your website
  • Become affiliate partner to earn revenue
  • Monetize your website with ads like Adsense to earn
  • Develop your own products to earn revenue

Site authority & It’s challenges

Like every business, even authority sites have their own set of challenges. I have seen a lot of people trying to sell online money-making guides and believe me only a few works. Let us talk about the challenges that you will face while building authority sites.

Developing Skill Set while building Authority Sites

Building a trusted website requires plenty of skills. I remember I used to suck at content writing. However, with time my writing skills improved, and with the help of tools like Grammarly the skills further amplified. You need to develop your skills for setting up a rich information platform online.

Not just writing skills, but other skill sets like web development, SEO, social media marketing, etc. I am not saying that you need to learn extensively, however you should have a fair idea as to what you intend to do and how it can be done.

This is not easy and it will take time. So if you think that setting up a blog and earning from it can be achieved in a short span of time. You’re wrong. Once you develop your competencies it will take time and energy and a lot of thought to get the ball rolling.

I will list the core topic on which you should have the utmost clarity. In other words, you need to develop these skills if in case you want to create a trustworthy website.

  • Research the topic of your blog site or better called as a niche research
  • Effective and good quality link building
  • You should have exemplary writing skills
  • A considerate amount of small scale systems and web management

Gathering resources & building authority sites

When I talk about resources there are only two. One is time and the other is money. It is important to channel these resources in an effective way in order to make full use of them.

As a new blogger, I spent money on things that were really not required at the initial stages. However, when I learned the anatomy of building a trusted website I spent my money on things that were ideally required. There are a few things that I would advise never to invest in.

I spent my money on content writing which was not at all required. I did not know about plagiarism and hence ended up posting duplicate content on my blog site which got me down in SEO rankings.

Never buy content, and if you decide to buy make sure that it is free of plagiarism and the quality is top-notch. Also, make sure that you invest in technology only when it is of the utmost importance.

I recently invested in a wonderful SEO WordPress plugin called Yoast. Furthermore, I purchased Newspaper 9 theme full version. These things helped me a great deal in jumping in Google rankings. So always think thrice while investing in things related to your trustworthy website.

Automation of authority website

The trouble I had while developing my blog site and its corresponding revenue systems was interlinking these small systems. Think of your authority site as a business, this business will have different parts and sections. In order to make them work together, you need to create links between these separate entities.

This, in turn, requires a skill set and a lot of planning and making a robust strategy. Once these different complex revenue streams and their corresponding technologies work in tandem you start getting results.

The problem here lies in the fact that a trustworthy site is a mix of a lot of moving part and systems which need to be integrated together to get your site moving up in the ranking chain.

Dealing with the above challenges while building authority sites

Once my blog site was functional I started looking at the traffic trend in comparison to my revenue channels. After studying the correlation between these two moving factors I came to know that these moving parts are interrelated in a specific way. The point, however, is that working simultaneously on these channels and streams will not give results.

Instead, these channels and streams need to be developed one at a time. This way the system becomes more efficient and the revenue graphs start climbing.   I would suggest that first start building organic traffic by doing SEO. I use the Yoast SEO plugin for my WordPress site. Then I developed social media platforms for social traffic and lastly came the paid ads. Below is what I understood by developing these individual channels.

Always remember!

  • Organic traffic is best for generating revenue from affiliate channels.
  • Social traffic is best for revenue generations from ad platforms like Google Ad-sense
  • Paid traffic is specifically for the products that you develop on your website and sell.

Let me help you to build a trusted website

A trustworthy website or an authority website is built in stages. You need to understand that building authority sites have different moving parts. If you start working on them at one go, you will fail. Rather, I worked, and mind you still working in three stages to getting my site turned into an authority site.

Furthermore, working on one thing at a time is more efficient rather than working on all the things in one go. This way you can start one revenue channel and once it’s stable then move to the next revenue streams. This way you won’t get into any financial crisis. In fact, the ROI (Return on investment) is much better.

Finalizing niche of your website

The first task even before you can start building a trustworthy website is Niche selection. A lot of people do it, a few people don’t. Look when I started my blog I just went with the concept of a travel blog as I like traveling. With time my interest developed in WordPress and SEO, so I created categories on my blog.

If you want to create an authority website just for profit, then do thorough niche research. I just lais out things that I liked on my blog.

Of course, I do a lot of keyword research when I write content, but I did not really do extensive research on niche selection. However, again stressing the point that If you are creating a site just for profits then do extensive research on the topic which you are choosing. Below are a few questions that you can ask yourself while doing niche research.

  • Are similar websites doing good on that topic?
  • Is it a passion or a profitable niche?
  • Will you be selling physical products?
  • Will this be an information website?
  • In the keyword competition low or high?
  • Are similar niche sites ranking well?

Once you are done with the niche research, let us go ahead and understand the anatomy of building authority sites in three stages. The reason why I divided the entire process into three stages is that it’s easy to work and establish one phase then move to the other one. Rather than working on everything at the same time.

Important note: While developing any traffic source for your website make sure that you start collecting emails from day one. This will help us in stage 3

An email list is a boon when it comes to selling your own products

Stage 1 (Building affiliate channels & organic traffic)

To build a trusted website, the first stage deals with building lots of affiliate product links and a lot of affiliate write-ups. Also, you need to build a considerate amount of organic traffic. The reason why I chose to build this combination first as this the easiest, cheapest, and high ROI combination.

To be quite honest I need some cash flow for my next two stages. This combination will start the ball rolling and will be a continuous source of revenue. This revenue can be invested in further stages to build more income from your website. Webmasters running the affiliate marketing on their website would now a massive amount of ROI in it besides being a consistent source of income.

Let us build some traffic (SEO)

Most of the traffic on your website in this stage will be coming via search engines. Furthermore, since this is a start I would advise you to start doing extensive SEO. I made a mistake when I started my blog. I published articles first and then did the SEO. However, this is a bad practice. Nowadays I optimize my posts right before posting. Check out my module on modern SEO, this will help you in ranking better in search engines.

So do the SEO, do proper keyword research, build more backlinks, and collaborate with others in your niche. This will give you an immediate boost in your SEO.

One important fact is that SEO these days takes a lot of time. You will not start getting results in a month or so. You might have to wait for months to see the organic traffic coming as a result of you doing SEO for your blog. It might take 6-12 months. So you need to be patient and should know upfront that this is a time taking process. Just do not do one thing while doing this. DON”T QUIT! Most people quit as they are looking for results from SEO in a short span. This is not possible at all.

The good part about organic traffic is that once you start getting it, it grows with time if you are creating content for your visitors and not for search engines.

Affiliate Monetization

Once you have a considerable amount of organic traffic coming you can start building your affiliate channels. The first affiliation I had was with Bluehost. Surprisingly, the Bluehost affiliate channel gave me a jump start when it comes to generating cash flow. I was getting $65 as a commission on each sale. Slowly and steadily I affiliated with Siteground hosting, booking.com, and Amazon. These companies too pay some amazing commissions. Few affiliate companies need your website to be a trustworthy website only then they approve your affiliate application. Affiliate channels in an authority website is not a perk or privilege, rather it has to be earned.

After you build a trusted website the first stage as discussed will be the development of affiliate channels and organic traffic. Your focus should be on writing about products that sell. Write exceptionally amazing affiliate content that compels your visitors to buy products from your affiliate companies.

This would be the right time to invest in content, look out for writers who can write amazing affiliate content for you. I happen to have 3 such writers in my team. Let me know if you need help. Everything comes with a price! Wink wink 🙂

Types of affiliate selling

In any trustworthy website when it comes to earning from affiliate channels there are two ways.

  • Firstly, you can write affiliate content like the way I did on my Bluehost page.
  • Secondly, you can link different products from the affiliate channel as I do with Amazon.com affiliates.

Stage 2 of Building Authority Sites

The second stage in the trustworthy website is a combination of social media traffic and display ads. This can be a little tricky. I use Google Adsense as my display ad partner. Google approves only authority websites now.

Their screening process is tough and they do not approve any authority website just like that. They look at every minute detail which can add value to their visitors.

Social media traffic in a trusted website

Building traffic is easy when it comes to social media as compared to building authority sites. You need to create a social presence of your website or blog on all major social platforms.

I started with a Facebook page where I have close to 4.5 k people following me. Then I created an Instagram profile. Lastly, I created a Twitter profile. My chunk of traffic would come from these three social platforms as these are used by the majority of users online.

Ad monetization of an authority website in stage 2

Now we are past building affiliate links and articles for our affiliate income. Now on your trustworthy website, you can induce ads. People will talk about a lot of platforms, however, nothing beats Google Adsense. Even though the approval process of Adsense is tough, however once approved it’s a boon for your authority website.

Unlike in building an affiliate channel, your focus on selective keywords for specific products while creating content. However, in-display ads all you gotta do is write a user engaging information that may or may not be specific to any product which you are selling. Always remember content is the king and will always be.

Stage 3 in your authority website

This is the final stage in building authority sites. If you are paying attention to each detail in this guide by this time you’re website should be generating some amount of revenue. Here all the traffic sources and all the revue channels work in tandem and your trustworthy website becomes a full-fledged business.

There are final two additions here, the first is the traffic source which will primarily be paid traffic, and the second, a product that you have designed and intend to sell.

By this time we have two important things at our disposal. First, is the traffic coming via SEO and social media. Second is the email list that I suggested that you start collecting even before stage 1 starts. A person who is taking the time to fill in his details and share his email ID means that he is an avid visitor to your website. This is the most important form of traffic.

Monetization of your own products & Site Authority

Creating your own products on your authority website is the toughest thing to do. You need to extensively understand what your audience needs. Products can of any kind, however mostly webmasters who develop their own products fall under three categories.

  • Information products like PDF guides which a visitor may purchase
  • Physical products if you are manufacturing something
  • Memberships if you post regular content and people like that you post. Kind of like a Netflix series. Most YouTubers do this and they have paid membership opened on their channel once they cross a million subscribers.

Kind of product that you design and sell to your audience largely depends on the niche and kind of audience you have built-in stages 1 and 2.

Traffic which will buy your created products

You now have a considerable amount of organic traffic, traffic from social media, and an email directory of your avid visitors. You can continue to increase these by paying attention to individual traffic sources, however, this traffic will be enough for selling your products. I would suggest that you leverage your email list to its utmost capacity. An email list is a gold mine and people who can take an effort to list their email ID are certainly interested in your website and your products.

Content for your product

I would say create a page. I wanted to start offering SEO consultation to my clients so I am in the processing of creating a page that will be specific for my SEO services. Creating pages for your specialized products and explaining to people how you can add value to them will do wonders for you.

Write exceptional content for your email list. Furthermore, create fabulous infographic-filled newsletters for your subscribers. This will tell your visitors that you are coming up with a new product and how can you add value to their business.

This brings us to the end of the module where you learned to build a trusted website. Whatever website you build online to make sure it’s a trustworthy website. Else there are millions of websites willing to take your place.