
Home Blog Page 20

Internal linking for SEO

We all know the important role played by links in SEO. Internal linking in SEO is something that you should pay attention to. Proper linking is important and an integral part of modern SEO. I wrote an article about link building before. We all know how important it is to create quality backlinks.

In this article, we will be talking about internal links and not external ones. This will be a comprehensive article on internal linking and its benefits in modern SEO. Creating external links is tough; however, creating internal ones is easy. Let us understand this step by step for complete understanding and to get more clarity on internal link optimization and how Google spider crawls them.

When I started building the internal links as an SEO strategy, I saw a 40% increase in the overall web traffic of my blog. This definitely helps in SEO. No one should ever neglect it.

What is internal linking?

The first question that comes to mind is what is internal linking. Let us define it first. In simple terms, internal linking referred to two pages linked together on the same domain. A classic example will be Wikipedia. They have a strong linking strategy that helps them in getting to the top of search results.

If you read an article on Wikipedia, you will notice that an elaborated content page may have hundreds of links pointing to other relevant pages in Wikipedia. In layman’s terms, an internal link is a hyperlink that points to another page on the same website. Now when we have defined internal links, let us find out why we need them? In a broader sense, they help any webmaster in three different ways.

  1. They allow visitors on the website to navigate across the content more efficiently
  2. These links create a hierarchy for the website and help Google bots to identify the website structure
  3. These links help to spread page authority from one page to another increasing overall authority

Now let us discuss the above points in detail for better understanding.

Effective website navigation

Internal links optimization helps Google bots and visitors to efficiently navigate the website.

Internal linking helps visitors and Google bots to efficiently navigate your website. Better navigation means that both the visitors and Google bots have access to complete content on your website. Clear navigation gives people access to more content. This means that visitors will spend more time on your website and Google absolutely loves this. Increased session duration means a higher ranking in searches.

Website infrastructure and Google spiders

Google needs to see the entire content structure of your website. I know that you might say that you have already submitted the sitemap in Google search console, however, Google spider also needs to see the entire content structure through internal links. Google spider can be defined as a crawling algorithm from Google that looks out for all the internal links on a particular page. Let me explain this with an infographic here.
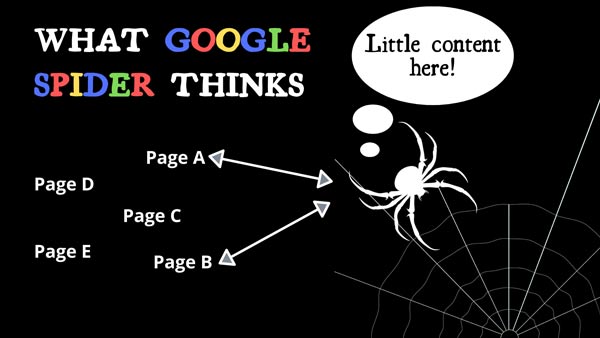
Google spider crawling links on the page.

In the above infographic, Google spider does not have access to the complete content of the website. Since page C, D & E are linked to page A & B which Google spider has access to, these pages which are not linked will not be crawled by Google algorithm. So please make sure that your pages are internally linked to each other.

When you link one page to another, the link authority of these pages gets shared. In other words, the page with higher link authority passes on the link juice to the page with less page authority.

This is something that every webmaster looks for, increasing link juice for the pages on their website. Most noteworthy, this method is absolutely under your control unlike building external links.

Google spider or bot crawls your website by going through each internal and external link. This bot first arrives at the homepage and then starts crawling. By following links, this Google bot find out the relation between different content. This way Google finds out what content covers what similar topics.

Internal linking in SEO & site structure

In order to further simplify take a look at the pyramid structure below. This infographic shows internal link optimization.

Internal link optimization in a form of a pyramid. Structured website is always liked by Google.

The main page of your website is your home page. Then comes your categories, sub-categories, and finally your posts. This site structure is always liked by Google bots as they know what are the different content pages on your website and how are they interrelated.

So your posts will be efficiently crawled by Google Spiders if it knew the topic on which the post is based. It can only know the topic in detail once you associate your post to a particular category. So have a well-laid out content structure.

I use WordPress as a CMS for my blog. Interestingly WordPress gives you plugin options so you can use any of the SEO plugins. I used the Yoast Plugin, which is the most used and common plugin. You can use the free version until the time you get familiar with the keywords and SEO.

Once you are familiar with Yoast free version, I strongly advise you to purchase their premium version. Besides the fact that the premium version allows you to target 5 keywords or focus phrases, it also gives you options for internal linking for SEO. Once you start writing a post, Yoast will automatically prompt and give you suggestions for linking similar articles on your website.
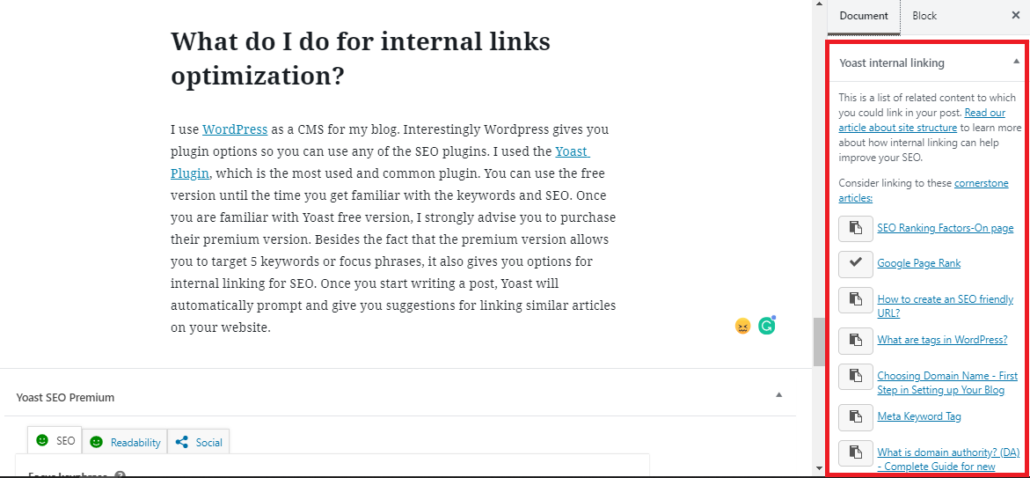
Screenshot showing similar articles in Yoast  plugin section  that you can link in your existing article which you are composing.
The right section tells you the similar articles that you can link to your existing post which you are writing.

This is yet another important entity in liking. Anchor text refers to the clickable text on which you are placing the hyperlink which is visible to the visitors. For e.g., If I link an article that I wrote about low-quality EMD and it’s adverse effects. In this statement, the phrase “Low-quality EMD and it’s adverse effect” becomes my anchor text.

An anchor text should always have keywords (Not stuffed though) and it should always give you a glimpse of what the linking article content is. In other words, anchor text should be relevant to the article you are linking to. Just do not go on a link-creating spree for the sake of creating these links. Read this excellent write-up on anchor text by outreachmama.

Setting up Internal linking strategy for SEO

There are ways to set up your internal link strategy for SEO. Let us discuss those strategies in detail here. You can link your text normally, however, there are other ways to boost your internal linking strategy.

Once a visitor lands on your webpage the first paragraph will decide if the visitor will stay or bounce off. Well-Written content will compel the visitor to stay and continue reading your article. How about we induce few links in the top paragraph so that the visitor has access to more webpages on your website.

This will not only give more variety and in-depth to your visitor but also will increase the session time. Hence the rankings will be pumped automatically. This is the first point you should consider while doing internal link optimization.

Write more cornerstone articles

Keep on adding more and more content to your website. More content means more webpages to link. I could have purchased a premium version of Yoast when I started my blog however I waited till I had about 50 articles on my blog. This gave me more webpages that I would link to my new articles.

Now when I write articles I write cornerstone articles. Cornerstone articles as per Yoast are articles that are 900 words or more. In other words, these articles are more descriptive and are the main articles on your blog niche. These articles are not like short stories but a complete movie that guides you on a particular topic from A to Z.

This article on Internal linking is one of my cornerstone articles. Try to write elaborate articles will all the information that a visitor might look for. Linking these cornerstone articles to your other articles will give a major SEO boost.

If you read my articles, you will find a related post section in the end. Post-reading this article you can read more related posts at the end of this page. Since I use WordPress, I use a plugin for showing these related posts. It is a free plugin and is called “Yet another related post plugin” in short YARPP. This is an amazing plugin with a lot of customization even in their free version. Try it!

I have never done this until recently. I found this incredibly effective. When I linked my cornerstone article to my tags and categories, Google rankings of my webpages had shown improvement. Even though internal link optimization takes time as you just can’t do it overnight. I would suggest start now and with time all your articles will get linked to each other. Link more articles to your tags and categories.

So this was all about internal linking strategy. I found all the above methods utterly useful and gave a massive boost to my SEO profile. If you have any questions related to internal linking just drop em in the comments below. If you want a free SEO consultation on your website please connect with me.

What are tags in WordPress?

I use WordPress as a content management platform for my blog site. I use it because it’s easy to set up and manage. If you use WordPress like me, you would know that while creating posts you can add tags.

I was confused earlier about these tags. I thought of these tags as additional keywords and used them to input all the keywords there. However, these tags in WordPress are for a specific reason. Let us try to understand the entire anatomy behind the tags in WordPress articles.

What are tags in WordPress?

Think of tags as a topic of discussion in a WordPress website. Categories are different and if you do not select the category a default category gets selected automatically. Unlike categories, tags have to be added to each article or post. In other words, a single category can have a broad range of topics covered.

I would say they are like keywords for different discussion topics. In WordPress nomenclature, both categories and tags are known as taxonomies.

Tags are optional however, you must stick to a limited of these entities and do not over-optimize. Some people think of them as keywords for a post. However, they are just keywords for the topic on which the article is written.

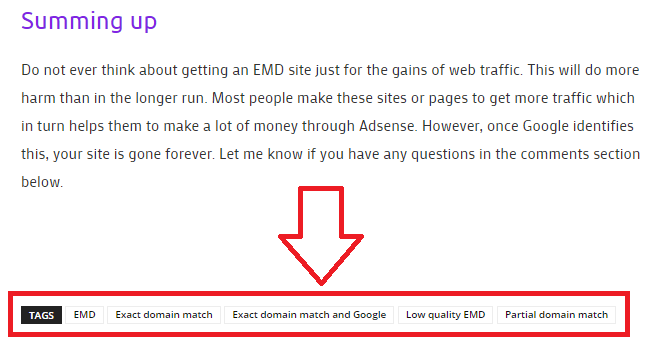
These are generally at the end of each article on your WordPress website. The way of the display depends on the theme type as well. For e.g. in my WordPress website, they come in the end. Check out the screenshot from my last article about low-quality EMD.

Tags in WordPress articles are displayed at the end of article.
Tags in WordPress website

What happens when you add these tags in WordPress articles?

When you add tags in a WordPress post, WordPress creates separates pages for each of the tags. Once you click the discussion topic you are taken to a page where all the articles are listed as per discussion topics or tags. This way the content on the website is more organized.

The webmaster and the visitors both are benefited from this concept. In other words, the content is more structured and organized. You can display these in the form of a widget in your sidebar if you want.

This way visitors coming to your website can straightway get to the discussion topic instead of rattling around the entire website. Google pays special attention to tag pages and it would be wise to say that these generate a lot of traffic.

Difference between categories and tags

Let us dig down a little deeper and let us talk about the difference between categories and tags.

  • Categories are meant for a broad categorization of your website content. Wherein tags are for displaying specific details about your posts. We can also call these website index words.
  • Categories are hierarchical however, tags are not.
  • Categories macro manage your content, wherein tags micro-manage your content.
  • You need to pick a category for your post, however, adding tags are optional.
  • The last difference is in the URL structure of category and tags. For categories, URL is something like yoursite.com/category/categoryname/ and for tags it’s http://yoursite.com/tag/tagword/

Is there a limit on the number of tags to be used?

Frankly “NO”. WordPress does not have a capping on the number of tags you can use in a post. You can use 100+ tags, however, they have to make sense if you are adding them to the article.

Let me give you an example. I write about WordPress, SEO, Travel, Photography, and other things in my life. These are basically the categories on my WordPress website.

However, while composing this article the category is SEO however the tags that I used were “tags in WordPress”, “tags in WordPress post”, “WordPress tags in a post” etc.

This means that my tags tell you about the topic of the article wherein the category tells you about specific classification saying that the article is related to SEO.

I keep my tags under 10 from the time I learned about tags and their relevance in modern SEO.

Categories vs tags. Which is better?

Both are equally important and have different purposes as explained in the article earlier. They work in tandem with each other and both have SEO relevance. We established the fact that Google bots do read URLs to identify the content type in my earlier article.

So while reading the category permalink and a tag permalink, both ways you will generate traffic if you optimize your URL as per Google guidelines.

How to choose tags for your articles?

Firstly you need to get into a tag mindset. I was searching for a motorcycle the other day. I love cruisers as I usually go for long-distance biking. While searching specifications on a website for motorcycles, I found a category names cruisers. However, I was looking for something more specific in cruiser motorcycles.

That was a bike with front disc breaks. The website owner was intelligent enough to add a tag name “Disc Brakes”. Bingo, the moment I was on this tag page, got a list of all the motorcycles with a disc brake. Always remember you are making the content for the users and not for search engines.

So think like a user, try to gauge visitor’s problems, and structure your website in a way that in 3 clicks he gets what he is looking for.

Summing Up

The goal of every search engine is to think like a user would think while searching for something. The same way we as webmasters need to think while keeping ourselves in visitor’s shoes.

If we can do that SEO would be so simple. I hope this article would have cleared all the doubts related to tags and it’s a comparison with categories. In case you have a question please leave them in the comments below. I would love to discuss this further.

What is low-quality EMD?

Let us understand low-quality EMD. I wrote an article about the exact domain match earlier. Also, I stressed that these do not work anymore. However, few webmasters still advise people to go for EMD’s. Unfortunately, EMD’s are now under strict scrutiny by Google than before. In other words, EMD’s do more harm than good in current SEO times.

Post Google’s Panda & Penguin the low-quality EMD sites were brutally penalized. They were affected so badly that they never recovered. For visitors who did not read my last article about EMD’s, let me give you a quick definition of the exact domain match, and then we will discuss these low-quality websites.

Definition

EMD websites use keywords to form a domain name. For e.g., if you are into the catering business in the city of new york, and if you choose the domain name as “newyorkcatering.com” you would have a substantial amount of traffic coming at you.

However, this is before the Google update in the year 2011 post which everything changed and EMD sites were not able to ripe the benefits of using keywords in the domain name.

Why EMD is harmful?

Webmasters earlier were taking undue advantage of this loophole and that is the reason why Google came hard on these sites. SEO experts were advising people to still take an EMD because most of them were not aware that Google no longer gives special weightage to EMD sites.

Since Google was looking at these sites more cautiously, they were under constant scrutiny. So, EMD’s are not beneficial now. Earlier they were. I recommend creating a domain with a brand name instead of keywords. Post which you need to work on it to make it rank better. For e.g. my blog Shutterholictv or for that matter shoutmeloud blog.

What should be done?

Try not to get into the abyss of low-quality EMD sites. Instead, think about a brand name that has quality content to rank better and an abundance of good quality backlinks. Webmasters usually choose a particular keyphrase for their domain as they want it to rank better in SERPs.

The idea is to get a keyword that is highly commercial, low competition, high search volume & high AdWords click rate. Then they register this keyphrase as their EMD site. However, this is more like developing a doorway page.

We all know Google hates these doorway pages. These EMD’s do a good job at first, however, when Google realizes that the site is nothing but a doorway page they categorize the website in the bucket of low-quality websites. There you go, now more ranking in search results.

Summing up

Do not ever think about getting an EMD site just for the gains of web traffic. This will do more harm than in the longer run. Most people make these sites or pages to get more traffic which in turn helps them to make a lot of money through Adsense. However, once Google identifies this, your site is gone forever. Let me know if you have any questions in the comments section below.

Site Organization

Welcome to yet another article. In this article, we will discuss in detail site organization. I have always emphasized that Google is one of the toughest search engines when it comes to ranking factors. A website layout is one of the factors which Google takes into account while assessing the rankings in personal searches.

So in this article let’s look at the factors which are directly related to website organization & structure. Key factors include creating a site map, clear Hierarchy of website, dynamic vs static pages, Robots.txt file, site load time, etc.

1. Create a sitemap

Creating a sitemap and submitting a site map to the Google search console is the first most important task after you create a website. If you go through the link in the previous line you will find an extensive article for creating a sitemap and submitting the same to Google.

Besides the fact that creating a site map helps Google in crawling your website more effectively, it also helps you in creating a structure for your visitors. Post creating a website I would also advise you to create a visual sitemap (Not for SEO purposes) which will help you to create a navigation system for you and your visitors. Creating sitemaps both for SEO and visual navigation is the first important task for a better site Organization.

2. Clear Hierarchy of a website as per website organization structure

The second task that we have on our hands is to create a visitor-friendly clear hierarchy of the website. Whatever content you post on your website should be accessible in 3 clicks at maximum from your home page.

Moreover, there should be a link pointing back to your home page on each webpage. Google-like when a user does not have to hunt around like crazy for something that he or she is looking for. The idea is to serve quality content quickly to the user in minimum clicks.

3. Keep the links limited on a page

Internal and external linking does help a lot with SEO. However, it should not be overdone. Google likes strategically places links and calls to action. Links should be for the benefit of a user and not just because linking is important. Keep them limited in a logical sense that is beneficial to visitors.

4. Dynamic vs static pages in site Organization

Let’s talk about dynamic vs static pages. If you are a blog owner most of your content will be static and not dynamic. To identify a static page has a fixed SEO-friendly URL structure, wherein a dynamic page will not and also it would a “?” in front of few parameters. Moreover, I like static pages as you can customize them to any extent, but not dynamic pages.

5. Robots.txt File

This is one of the most important files in the website root directory. It tells Googlebot how to crawl the website. Usually, Googlebot crawls the entire website. However, there are some pages that might have duplicate content that might not be worthy of getting crawled.

You can make changes in this file and tell Googlebot not to crawl specific pages. I will publish a more detailed article on the Robots.txt file in my upcoming posts. In the meantime, you can check if your website has Robots.txt or not by going to the Robots.txt tester from Google.

6. Check your website in different browsers

Different browsers might load your website differently. Firstly, I would recommend you do a browser compatibility test. This test will tell you in detail about all the issues which your web pages might have when working in tandem with different browsers.

7. Check the site load time

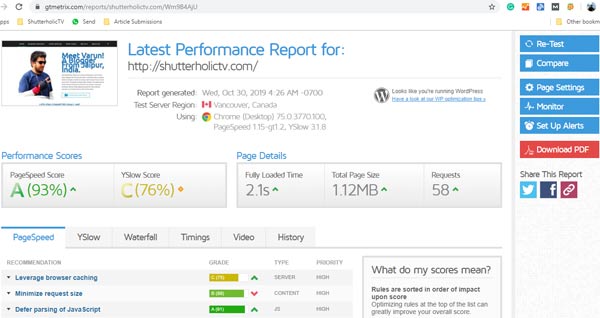
Well, this is probably the most talked about and most important factor with SEO. No one likes to wait. That buffering circle looks so annoying at times. Make sure that you rigorously and continuously check your website speed. I use GTMetrix free tool to check website speed. GTmetrix tells you the website speed accurately.

Furthermore, if there are any issues this online tool will tell you what modification needs to be done for improving site load time. Ideally, I would say that the site load time should be less than 3 seconds. Try to make your home page light. That is the page where people will land first. I will show you the latest report from GTMetrix for my blog. Look at the screenshot below.

Site load time in GTmetrix for shutterholictv.com | dynamic vs static pages
Site load time is 2.1 second which is good enough for Google bots

If you need help in improving your site load time connect with me at shutterholictv@gmail.com or on Skype my live ID is live:nurav_igayt_1.

So that was all about site organization. If you have any questions please leave them in the comments below.

What is a sitemap?

Welcome to another article in my SEO 2019 and beyond series. In this article, we would create a sitemap and then submit the sitemap to Google. I use WordPress so this article would primarily be about creating a WordPress sitemap. We will talk about the sitemap generator for WordPress and then submit the site map to Google.

I will include screenshots where ever necessary for a better understanding. This article is not about the visual sitemap which you create before creating a website but a site map which is created only for SEO purpose. Learn why your website needs SEO. Let’s start.

What is a sitemap and why do I need it?

A sitemap is a file where you keep an organizational hierarchy of all your posts, pages & media files. Consider this as an organizational hierarchy chart that you create in your office. People just by looking at your office chart will get to know what authority or what position someone is working on.

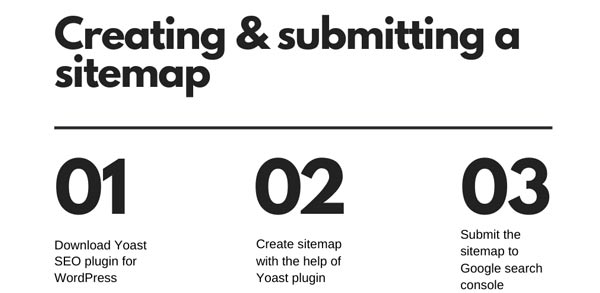
Similarly, a sitemap on the website tells Google about a structure that exists on your website. Google bots read this more intelligently and are able to crawl your site more efficiently for SEO. We will create and submit our sitemap in just 3 easy steps. All we need to do is, install a sitemap generator and submit the sitemap file to Google. Look at the visual below.

Create WordPress website sitemap in 3 easy steps | Download Yoast plugin | Create XML sitemap | Upload sitemap to Google search console.
3 steps to create a sitemap for your WordPress website

1. Download Yoast SEO plugin & create a sitemap

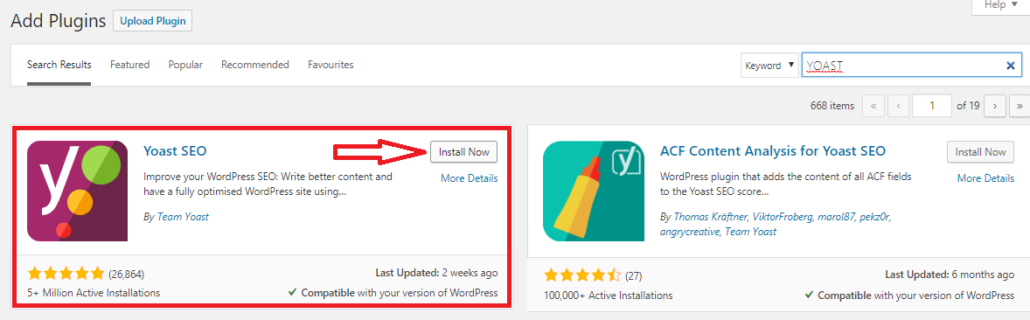
Yoast is an amazing plugin and does the job every time when it comes to SEO. I have been using Yoast for a long time now. The first task for you is to go to the plugin section in your WordPress backend and download Yoast.

Download Yoast SEO plugin from add new plugin link in your WordPress back end | Yoast is a free tool to generate sitemaps
Download Yoast from add new plugin link in your WordPress backend

When you click on install, the download process will start. All you need to do now is to activate the plugin. Bingo, now your website has an SEO plugin to generate sitemaps. Furthermore, this is a free sitemap generator. So you do not have to pay for anything. I have the premium version of Yoast because it gives me other benefits like targetting 5 keywords per article. I will leave this for future discussion.

2. Create a sitemap by Yoast Plugin

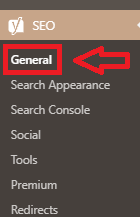
After installing the plugin you need to go to the general section of this SEO plugin. Just click on SEO and below you will find this section.

The general section in Yoast SEO plugin

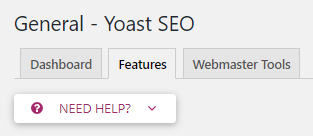
Click on the general section to go to general properties. Once you are in the general section there will be three tabs on the top. Namely, Dashboard, features, and webmaster tools. You need to click on the “features” tab.

Features section in Yoast plugin

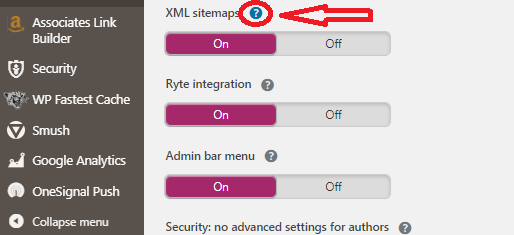
Under the features tab, you will get the option of an XML sitemap generator. Always set this to enabled mode. Now once you enable it Yost will automatically create a sitemap for your WordPress website. If you want to view the sitemap file then just click the question icon or the help button in the form of a question mark.

XML sitemap option in Yoast

Once you click on this “XML sitemap” help icon, Yoast will prompt you for certain options. Options like, see the XML sitemap. Read why XML Sitemaps are important for your site. Once you click on the XML sitemap a new window will open up with your website sitemap. For my blog shutterholicTV, the file looks like this.

XML sitemap of my blog

3. Add or submit a sitemap to Google search console

Submitting a sitemap to Google is very easy. There are a few steps involved. However, a person with basic knowledge of setting up a website can do this. You do not need to be a developer to be able to do this task.

First login to Google search console and add your website as a property.

A screen that looks like this where you will be able to add your website as a property in search console | Submit sitemap to Google
A screen that looks like this where you will be able to add your website as a property in search console.

After you add your website to the search console you will be taken to the next screen which will look like this. This step is to identify that you are the owner of the website you added in the above step as your property.

DNS verification in Google search console

Verify by adding code to hosting DNS

All you need to do is copy the code give by Google and add this code to your DNS configuration given by your hosting service provider. Now once you add click on “VERIFY”, Google will try to pick this code from your website, if successful Google will tell you that verification is complete. If your ownership does not verify even after the code is added to your DNS profile wait for a day and recheck again. Sometimes it does take a while to get the verification done. This is one way of doing it and requires technical knowledge.

Verify ownership through Yoast plugin

Second way of doing this is just copy-pasting the code in Yoast SEO plugin. Let me explain this with screenshots. Your code looks something like this.

google-site-verification=RDQlZWhDXfHa* * * * * * * * * * * * * * * *
All you need to do is copy the code after the “=” sign. So copy ” RDQlZWhDXfHa* * * * * * * * * * * * * * * * ” and then paste this in Yoast.

First, go to the Yoast dashboard and click on the webmaster tools.

Webmaster tools in Yoast dashboard

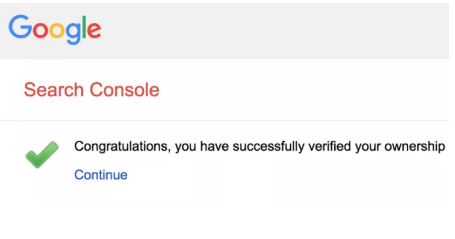
If you look at the screenshot above you can add your Google search code here. Furthermore, not just Google but also Bing, Yandex and Baidu verification code as well. Once you are done click on save changes. Once you click on save changes come back to search console and click on verify ownership. If you followed all the steps till this point, once you click verify you should get a message like this.

Successfully verified message in Google search console for sitemap addition

There you go, Google has identified you as the owner for your website and your webpages are ready to be crawled by Google bots. I have tried to keep this as simple as possible. For the WordPress site, I would strongly recommend using the procedure as per the Yoast SEO plugin. If you have any questions related to the sitemap please drop them in the comments below. I would get back to you as soon as possible.

On-page content structure

I wrote an article earlier about the on-page SEO factors before. However, that was a brief introduction to on-page SEO. This article, on the other hand, is more elaborate. We will discuss in detail the on-page content structure. We already discussed the first factor in detail in my last article which was about URL structure & the quality of content as well. This article will have proper guidelines to set, Meta title tags of the webpage, Meta description, Headings, Image optimization, do & no-follow links, & other links on the page. Let us do this step by step.

Meta title tags in On-page content structure

This is the most important part of your webpage listing in searches. I would say that this is a name tag for a page. Google bots read this title and then try to know about the content of the page.

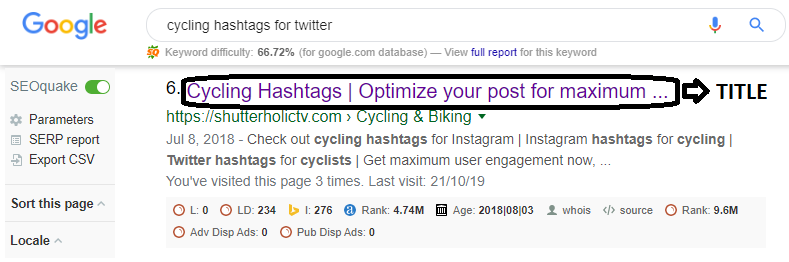
Meta title in on-page content structure
A meta title is the top heading of your page listing in searches

My article is ranking currently in 6th position in the searches for the keyword “cycling hashtags”. Meta title tells a visitor about any page of the website and it appears on the top of your browser as well. These days most people use CMS like WordPress, Square space & others. These platforms give you the option of adding the meta title. For WordPress, a plugin called Yoast does the job.

Meta title in Yoast plugin for WordPress
Optin for adding meta title in Yoast plugin in WordPress

This is an SEO plugin. However, when writing the code manually you can add a meta title tag in the <head> section in your site’s HTML. It should look something like this:

<head>
<title>On-page content structure | Organized pages that Google & visitors love</title>
</head>

These are inevitability the most important part of On-page content structure as visitors decide to click on the link or not by looking at the title. When writing the meta title there are a few things that should be kept in mind. I am listing these pointers below.

Checklist

  • The length of the title should be between 50-60 characters including spaces. Less than 50 will create a problem and more than 60 again the complete title will not fit the space for search title space. If you look at the screenshot above, the green line just below the title shows that length is as per Google standards. Yoast has this feature.
  • You need to mention your focus keyword at the beginning of the title and then the other keywords. The end of the title should have the brand name if you are inclined to promote your business.
  • Do not duplicate the meta title tags even though you might write similar content for two pages. They have to be unique for different pages else this will affect your SEO negatively.
  • The meta title tag needs to explain exactly what the page is all about. If you try to misguide the visitor by writing something else in the title and the content is different, the user will bounce off increating your bounce rate. Google again will not like this.
  • Do not stuff keywords unnecessarily in the title. A title should be logical and should not sound vague while reading.
  • Finally, keep your title different from your heading. This is done to increase your chances of appearing for different search terms.

Meta description

Another important component that appears just below the meta title. This description tells you briefly about the content of the page. This is another factor that compels a user to click on your page link. It looks something like this.

Meta description in google searches | Meta description for SEO | Image optimization | follow links
Meta description in google searches

Again Yoast does an amazing job in WordPress and gives you the option for adding a description for your page. In basic code, this looks something like this. Now look at the words which are in bold, these are theme words that Google has highlighted.

<head>

<meta name=”description” content=” Simply post an image using appropriate cycling hashtags and you’ll soon be attracting likes and follows from similarly minded cyclists. “>

</head>

The meta description needs to be optimized for your visitors. Google will try to judge the content based on your description. Below are the points that you should keep in mind while writing a meta description.

Checklist

  • The length of the meta description should not exceed more than 160 characters.
  • Provide an understandable summary of your content. The description should be concise and accurate to what the page is all about.
  • Keywords should be added in the description, but do not stuff unnecessarily. The sentence should be meaningful and not vague again.
  • The meta description needs to be unique for each page and not the same.
  • You can use special characters in your description, however, the description structure should make sense.
  • Lastly, include a call to action in the description.

Image optimization is an on-page SEO factor

We all know that Google cannot read the content in your image. Then the question that pops up is how do we tell Google that the image we are using is for a particular subject? For doing this Google introduced an Image optimization feature which is Alt text. For every image that you now upload on your page, Google asks you to add an Alt text to it. This Alt text tells Google bots about the nature of the image. I do this when I upload any image. WordPress gives you an option to do this. Look at the screenshot below.

Image optimization and Alt text for  SEO of images | follow links
Option to add Alt text for images in WordPress, this is done by Yoast.

This is basically describing your image. There is a checklist that I follow while dealing with image optimization. If you follow this checklist, even your image will rank higher in the searches. This is tried and tested.

Checklist

  • Use images that are unique and have a great affinity to your webpage. The images should be a shadow of your content.
  • Use the highest quality formats, make sure that your images do not get pixelated. No one likes distorted images.
  • When using high-quality images make sure that the size is in KB’s and not MB’s, if the size is more your page load time will increase. Especially in mobile searches. Moreover, you know that 60% of searches happen on a mobile device.
  • If you are using multiple images, make sure that they are in a logical order. Image placement is something that people make a mistake with. Illogical placement will make your images and content look bad.
  • Use a caption that tells your visitors about the image that you are using. I would say include your keywords in your caption. That helps a lot in searches.
  • Lastly, and most important write an amazing Alt text. This will be the description of your image in searches. Google will read this and will know the purpose of your image. This is the most important factor when it comes to image optimization.

To sum up, image optimization needs to be done for each image in order to get more traffic and better rankings in searches.

There are two types of backlinks in SEO. They are “do” follow and “no” follow backlinks. Let us define each one of them to eliminate the confusion. We all know about the link juice now. So the purpose of these links is to pass or not pass the link juice.

This type of link does not pass the SEO benefits or link juice from the source site to the blog where it is pointed. These links are of no value to a website owner. A visitor can navigate to your blog from the source site, however, when it comes to link juice there is none.

This type of link will pass on the link juice or the SEO benefits from the source site to your website. Once you create a blog, you should spend considerable time building “Dofollow” backlinks to your website. There are a lot of ways of doing this. You can build follow links in article directories, in web 2.0 properties, in forums, and in high PR blogs, among many others. The best way in fact of building these following links is the article directories. However, not all the directories provide dofollow links. So keep a check on this. I am listing a list of dofollow link sites and web 2.0 properties for your reference. You can download the “follow links” list from the link below.

Summing Up

Building backlinks is a tedious task because you have to properly target the right places to build those links. Always ensure that most links are do-follow backlinks for SEO reasons. Building an excellent backlink profile with a mixture of do-follow and no-follow links is going to be truly rewarding. So if you have any questions regarding the On-page content structure do let me know in the comment section.

SEO Keyword Themes

I wanted to write about SEO keyword themes just after I wrote about content quality. This is because it comes under content writing and is equally important. This might be a little complex but let me give you an insight. Firstly, I would like you to install Search engine tools. The extension or plugin is called as SEOquake.

You just need to create a free account and the plugin gives you a wide variety of SEO metrics. Metrics like DA, PA, rankings, link, social share, and most importantly keyword density. Finding or inducing theme words for SEO is something that no one thinks of. No SEO company will ever tell you to do this. However, this is something that Google takes into account calculating the rankings.

What are the keyword theme words?

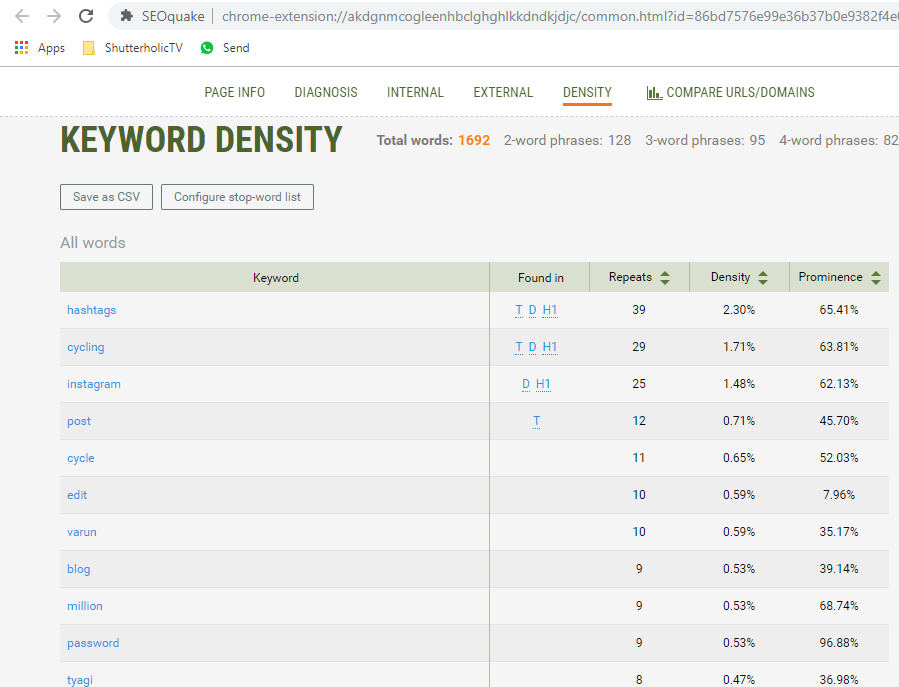
Let me give you an example to make you understand better. Let us take a look at the article that I wrote last year. This article is currently on number 7th spot for the keyword “Cycling hashtags”. Now once you install SEO Quake, just click on the option of keyword density. The words and key phrases that I have in the article which are in relation to my focus keywords are called theme words. Look at the screenshot below.

Screen shot showcasing keyword density as explained in  SEO Keyword Themes | Search engine tools
A closely related word like cycling, hashtags, Instagram, cycle, post

If you think about it most of the words in the articles are closely related to each other. Thus forming a logical content that Google bots find worthy of showcasing in the top 10 results. By the looks of it, I have come to a cunclusion that more the theme words around a perticualr keyword, more Google is able to judge the content quality.

I strongly recommend installing search engine tools like SEO Quake to get the keyword density. We do not have to look at the density though, but the keywords or the key phrases that SEOQuake is displaying. Post knowing and researching a lot about how the search engine works, finding theme words for SEO has become an integral part of my content writing.

To sum up SEO Keyword Themes are important while writing content. These will tell Google how good your content is. More close related themewords means that you are an expert in the subject as you know the terminolodgy of the topic you are focusing on. Let me know if you have any questions in the comment section below.

How to create an SEO friendly URL?

let us talk about SEO friendly URLs. I did a mistake a few months back. I purposely changed the URL structure of my website. Unaware of what adverse effect it can have on the SEO. My rankings immediately went down. Also, the organic traffic dropped phenomenally. There is a golden rule when it comes to changing URLs. The rule says do not change the URL ever and if you do, make sure there are proper redirects.

I would recommend never changing the URL or better-called permalink in SEO. The permalink structures should never be changed and they should be created with utmost caution. In this article, I am going to discuss 10 ways of creating an SEO friendly URL for your website. Follow these tips for creating a search engine-friendly URL structure for your website. Google-friendly URLs are a boon for your website. So, let’s get them right.

10 tips for URL optimization for better rankings

Use keywords in URL’s

Most important thing is to use your keyword in the URLs. Google crawlers and your visitors will know that content niche just by looking at your URL. However, I would also make a point that, do not stuff many keywords in the URLs. Google crawlers are intelligent enough to identify keyword stuffing. They will penalize the site. Also, try to keep the keyword at the beginning of the URL. Google crawlers pay attention to the start of the URL’s first and then the rest of it. Take a look at the example below. My article for cyclists searching for Instagram hashtags is on the first page of search results for different similar keywords.

Permalink structures for websites and how to make them SEO friendly

Of course, there are other things that got me to the top. However, the URL structure also helps. Keep it short, organized, and with an induced keyword. I was having this structure before, now I just have the blog post link in front of my domain name. This is way more effective. Look at one of the permalinks below.

This article stands at number 4 at Google ranking for the keyword cycling hashtags.

Read this article here.

Use hyphens and not underscores

In the last part of the Google-friendly URL mentioned above, I have used hyphens as separators between the words in the URL. Always do this, do not use any other symbol or rather underscores. ( _ ) Some webmasters were using this, however, it does not work now. Google time and again has stressed the fact that it does not read underscores, but always takes hyphens into account as separators of words in a search engine friendly URL. Permalink structures should always have words separated with hyphens. Please note this.

An SEO friendly URL must be easy to read

A visitor who is coming on your page should be able to understand in one go, just by looking at your URL. Make it short but keep it descriptive. The words which constitute the URL should give a clear message about the content of the page. Search engines can’t unscramble crazy, dynamically generated URLs, nor do they even try.

Add redirects if URL changes

I would advise never to do this. Never change a URL, however, if you are compelled to do so because of any reason, add a redirect. When you change a URL, it means that you are removing an indexed page from Google’s reach. Your ranking will also go down if Googles find no content on the link. So always add redirects. This notifies search engines that the URL is directed to an address where content exists.

Google guidelines on redirects

Upload a favicon

To be honest there is no SEO relevance of favicon. However, I find that this should be a must feature. If a browser displays your favicon it represents brand trust and helps in identifying websites. It is always better to have one rather than not having one. It looks good too.

Add Mobile SEO friendly URL to a sitemap

Most of the platforms where you can design and develop a website offer responsive themes and layouts. However, it is always better to add mobile-friendly URLs in the sitemap. Here is the tool for checking the mobile responsiveness from Google. Google-friendly URLs for mobiles are a must if you want to rank your pages in mobile searches.

There should be no capital letters in the URLs. This is bad and it confuses the search engines and the visitors too. E.g. take a look at the URLs below.

thedomainname.com/target-keyword

Thedomainnam.com/Target-Keyword

Adding capital letters, in a way, encrypts your URL by making it exponentially harder to remember. So it is always advisable not to use capital letters in the URL.

Organize your content if folders & subfolders

Your URL will signify the content niche. You need to be very careful about how you place your content and in which folder. (Category) Google reads the category too and that makes it easier to understand for Google crawlers as to what the content is all about. URL structure can signal the importance of a page on your site. Also, I would suggest that you do not make many folders. Limit them to two at max. For e.g. Domain.com/Category/Subcategory/post

Use Canonical SEO friendly URL

This is the most important when it comes to dynamic URLs. Dynamic pages can sometimes accidentally create duplicate content. Unknowingly, you might get penalized by Google. To avoid this use a canonical URL. It happens a lot on shopping websites. For e.g. consider a URL yourdomain.com/macbook-pro-15inch, other URLs on the same site can also access the same content of this page. Google crawlers will get confused as to which is the actual link. To avoid this, add a rel=”canonical” link element in the head of each of those pages with the same content.  In the above case, it will be <link rel=”canonical” href=”https:// yourdomain.com/macbook-pro-15inch ” /> This will tell Google that the original URL is yourdomain.com/macbook-pro-15inch .

Domain redirect for search engine friendly URL

A lot of people do not do this. However, I do recommend doing this. My website address is shutterholictv.com, also it’s www.shutterholictv.com. You must be wondering, that these two are the same Google-friendly URLs. Yes, they are. However, not in the eyes of Google. Google treats these two URLs differently as two different websites. To fix this, set your preferred domain redirect as either shutterholictv.com  or  www.shutterholictv.com. This will redirect your non-preferred domain to your preferred domain.

Summing Up

If you follow the above-mentioned 10 tips to create SEO-friendly permalink structures, your pages will rank higher in the search. If you have a question about permalink structures, Google-friendly URLs, or URL structures, please drop a comment below. I will get back to you.